Sharding and Partitioning Strategies in System Design: Range, Hash, and Directory Explained
-
Last Updated: August 7, 2026
-
By: javahandson
-
Series

Sharding and partitioning strategies in system design explained simply — compare range, hash, and directory sharding, pick the right shard key, and avoid hotspots.
Your database was fast on day one. Then your users grew, your tables crossed a few hundred million rows, and every query started to crawl. You added an index. You upgraded the server. It helped for a while, and then it stopped helping. This is the moment most backend teams meet database sharding for the first time.
Sharding and partitioning are the tools we reach for when one database can no longer hold all the data or serve all the traffic. Instead of one giant table on one giant machine, we split the data into smaller pieces and spread them across many machines. Each piece is easier to store, faster to query, and simpler to scale. The tricky part is deciding how to split the data, and that is exactly what this article is about.
This guide is written for backend developers who already build services but have not yet designed a data layer that spans many machines. We will keep the language simple and the examples practical. We will cover the three classic partitioning strategies — range, hash, and directory — and walk through when each one shines and where each one hurts. By the end, you will be able to pick a shard key and a strategy with confidence, and explain your choice clearly in a system design interview.
A quick note on scope before we start. Sharding is a big topic, so we will not cover every corner. Instead, we focus on the ideas you meet most often on the job and in interviews: how to split data, how to route to the right piece, and what breaks once your data outgrows one machine. Get these right, and the deeper topics become far easier to pick up later.
People use these two words loosely, and that causes confusion. Let us make the difference clear before we go further.
Partitioning means splitting one large table into smaller parts called partitions. The idea is to break a big dataset into chunks that are easier to manage. Partitioning can happen inside a single database, on a single machine. Many databases support this out of the box.
There are two directions you can split a table. You can split by rows or by columns, and the two have different names.
Most system design conversations are about horizontal partitioning, because that is what lets you handle huge row counts. So when we talk about splitting data across machines below, we mean the horizontal kind.
Sharding is horizontal partitioning taken across many machines. Each partition now lives on its own database server, and each such server is called a shard. So a shard is just a partition that sits on a separate node.
Here is the simple way to remember it. Partitioning is about how you split the data. Sharding is about where the split pieces live. When the partitions move to different servers, we call it sharding. The strategies we discuss next — range, hash, and directory — apply to both, but they matter most once the data is spread across shards.
| Aspect | Partitioning | Sharding |
|---|---|---|
| Scope | Within one database | Across many databases |
| Main goal | Easier data management | Scale beyond one machine |
| Machines | Usually a single node | Many nodes |
| Failure impact | One database down | Only one shard affected |
| Complexity | Lower | Higher |
Sharding adds real complexity, so we should only do it when we have a good reason. There are three common reasons, and usually more than one applies at the same time.
Notice that sharding is a last resort, not a first move. Before you shard, try a read replica, a cache, or a bigger machine. Sharding is powerful, but it makes joins, transactions, and reporting harder. Reach for it only when simpler options run out.
Before we compare strategies, we need to understand the shard key. The shard key is the column, or set of columns, that decides which shard a row goes to. Every strategy takes the shard key as its input and returns a shard as its output.
The shard key choice shapes everything. A good key spreads data and traffic evenly across shards. A bad key piles most of the load onto one shard, which is called a hotspot. When you have a hotspot, one shard melts while the others sit idle, and you get none of the benefit of sharding.
Keep these three rules in mind as we go through each strategy, because the strategy and the key work together. A great strategy with a poor key still gives you a broken system.
There are three classic ways to map a shard key to a shard: range-based, hash-based, and directory-based. Each takes the same input, the shard key, and answers the same question — which shard? — but each answers it differently. The diagram below shows all three side by side before we dig into each one.
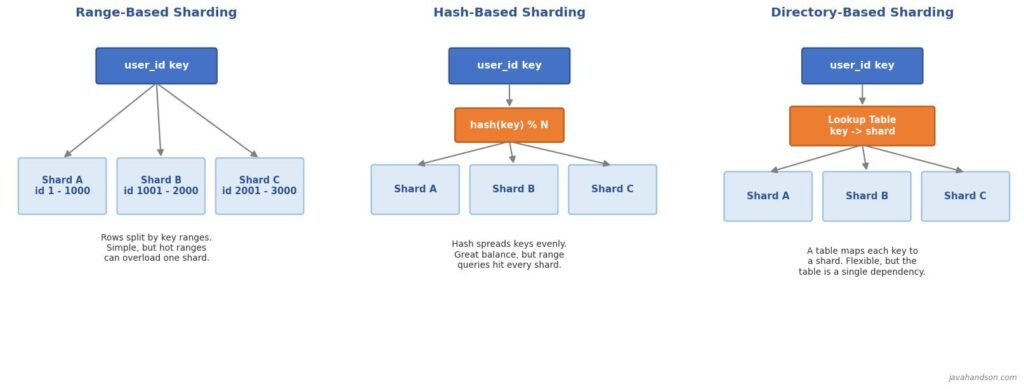
Range-based sharding splits data using ranges of the shard key. You pick boundaries, and each shard owns one continuous range. Think of it like a set of encyclopedias, where volume one holds A to F and volume two holds G to L.
Say you shard users by their user ID. You might place IDs 1 to one million on shard A, IDs one million to two million on shard B, and so on. To find a row, you check which range its key falls into and go straight to that shard. The lookup is simple and needs no extra table.
The same idea works well for time-based data. Logs from January live on one shard, February on the next. This is common for event data, order history, and any system where records arrive in time order.
# Range-based routing (language-neutral pseudocode)

function pickShard(userId):
    if userId <= 1_000_000:
        return "shard_A"
    else if userId <= 2_000_000:
        return "shard_B"
    else:
        return "shard_C"

# A read or write first resolves the shard,
# then runs the query on that shard only.| Interview Insight Interviewers love to probe hotspots. If you say range-based sharding, expect the follow-up: what happens when all new writes land on the newest shard? A strong answer names the risk out loud and offers a fix — for example, choosing a key that does not grow monotonically, or combining ranges with a hashing step so hot ranges get spread out. |
Hash-based sharding runs the shard key through a hash function and uses the result to pick a shard. The hash scrambles the key, so even keys that look similar land on different shards. This is the most popular strategy for spreading load evenly.
The classic formula is hash(key) % N, where N is the number of shards. You hash the key to get a big number, then take the remainder when you divide by N. That remainder is the shard number. Because a good hash spreads values evenly, the rows spread evenly too.
# Hash-based routing (language-neutral pseudocode)

function pickShard(key, shardCount):
    h = hash(key)          # e.g. a stable 64-bit hash
    index = h % shardCount # remainder gives the shard number
    return shards[index]

# Same key always hashes to the same shard,
# so reads and writes stay consistent.The resharding pain has a well-known fix called consistent hashing. Instead of hash(key) % N, you place both shards and keys on a virtual ring. Each key belongs to the next shard clockwise on the ring.
The win is this: when you add or remove a shard, only the keys near that shard on the ring need to move. The rest stay put. This makes scaling far smoother, which is why systems like Cassandra and DynamoDB lean on consistent hashing under the hood. It is a deeper topic on its own, but knowing the name and the reason is often enough to impress in an interview.
| Interview Insight When you mention hash-based sharding, the natural next question is: how do you add a shard without moving all your data? The magic words are consistent hashing. Explain that plain modulo remaps almost everything, while consistent hashing moves only a small slice of keys. That single term shows you have thought past the textbook version. |
Directory-based sharding keeps a lookup table that maps each key, or each group of keys, to a shard. Instead of computing the shard with a formula, you look it up. This is the most flexible strategy, and also the one with the most moving parts.
You maintain a small, fast service — the directory — that answers one question: given this key, which shard holds it? When a request comes in, you first ask the directory, then go to the shard it names. The mapping lives in the directory, not in your code, so you can change it any time.
# Directory-based routing (language-neutral pseudocode)

# The directory is a fast key -> shard map,
# often cached in memory or held in Redis.

function pickShard(key):
    shard = directory.lookup(key)   # e.g. "user_42" -> "shard_B"
    if shard is null:
        shard = assignNewShard(key) # place new keys deliberately
        directory.put(key, shard)
return shardDirectory-based sharding fits multi-tenant systems well. Think of a SaaS product where each customer is a tenant. Mapping tenant to shard in a directory lets you isolate big customers and move tenants around as they grow.
Now that we have seen each one, let us put them next to each other. No strategy wins every time. The right choice depends on your queries, your growth, and how much complexity you can handle.
| Factor | Range | Hash | Directory |
|---|---|---|---|
| Even load | Weak | Strong | Manual |
| Range queries | Excellent | Poor | Depends |
| Point lookups | Good | Excellent | Good |
| Resharding | Moderate | Hard (plain) | Easy |
| Extra lookup | None | None | Yes |
| Complexity | Low | Medium | High |
| Best for | Time data | Even spread | Multi-tenant |
Sharding solves scale, but it creates new problems. Knowing these ahead of time saves you from painful surprises in production.
Once data lives on many shards, a join across shards is slow and awkward. You often must fetch from each shard and combine the results in your application. The common fix is to keep related data on the same shard, so joins stay local. Choosing the right shard key helps a lot here.
A transaction that spans two shards is much harder than one on a single database. Full two-phase commit is slow and fragile. Many teams avoid cross-shard transactions entirely by designing so that each transaction touches only one shard. When they cannot, they lean on patterns like the saga, which trades strict consistency for practicality.
Data grows unevenly over time, so a shard that was fine last year may be overloaded today. Rebalancing means moving data to even things out, and it is delicate work while the system is live. Consistent hashing reduces how much data moves, and a directory lets you move specific keys, but neither removes the need to watch your shards and plan for growth.
Sometimes one key gets far more traffic than any other. A celebrity user with millions of followers is the classic example. Even perfect hashing cannot help, because all that traffic targets one key on one shard. The usual answers are to cache that hot key aggressively, or to split its data further with a secondary key.
You cannot fix what you cannot see. Once a system is sharded, you must watch each shard on its own, not just the whole fleet as one number. Track the size, the query rate, and the latency per shard. When one shard drifts away from the others, you have found an imbalance before it becomes an outage.
Good monitoring turns rebalancing from a panic into a plan. If you spot a shard filling up faster than the rest, you can move data early during quiet hours, instead of scrambling when it runs out of room. Treat shard metrics as a first-class dashboard.
In the real world, teams rarely use one strategy in its pure form. They mix them to get the best of each. This is worth knowing, because interviewers often push you past the textbook answer toward something practical.
A composite shard key uses more than one column. A common pattern is to combine a tenant ID with a user ID in a multi-tenant app. This keeps all of a tenant’s data together while still spreading load across tenants. You get locality where you need it and balance where you want it.
Another useful pattern mixes range and hash. You hash the first part of the key to avoid hotspots, then range within each bucket for ordered access. Time-series systems use this a lot. They hash by device so writes spread out, and keep time ordered inside each bucket so recent-data queries stay fast.
Large systems sometimes shard in two layers. The first layer decides which cluster of shards holds the data. The second layer decides which shard inside that cluster. This sounds complex, and it is, but it gives you room to grow without a giant rebalance every time you add capacity. You add a whole cluster at once rather than reshuffling every key.
The lesson here is simple. Do not feel locked into one pure strategy. The three basic strategies are your building blocks, and real systems combine them freely to match how data is written and read.
Theory sticks better with a concrete example. Let us walk through sharding a chat application, the kind where users send messages inside conversations. This is a good teacher because it has clear read and write patterns, and the right shard key is not obvious at first.
First, we look at how the data is used, because that drives every choice. In a chat app, most reads fetch the recent messages of one conversation. Most writes add a new message to a conversation. Users almost always work inside one conversation at a time, so queries rarely span many conversations at once.
That single observation points us straight at the shard key. If we shard by conversation ID, then all messages of one chat land on the same shard. A read for a conversation touches exactly one shard. A write goes to one shard too. This is the locality we want.
Now which strategy fits? Range-based on conversation ID risks hotspots, since new and busy chats could cluster together. Hash-based on conversation ID spreads chats evenly across shards and keeps each conversation whole on one shard. For most chat apps, hash-based sharding on conversation ID is the clean choice.
# Chat app: shard by conversation, not by message.

function pickShard(conversationId, shardCount):
    h = hash(conversationId)
    return shards[h % shardCount]

# All messages of one conversation share a shard,
# so reading a chat's history hits a single shard.No design is free of trouble. A giant group chat with millions of messages can overload its shard. That is a hot-key problem, and we handle it by splitting that one conversation across shards by time, or by caching its recent messages hard. A user’s list of all conversations is another cross-shard query, which we solve with a separate index that maps each user to their conversations. These fixes are normal. Good sharding is not about avoiding every problem; it is about knowing which problems you are choosing.
You rarely write raw shard-routing code by hand in a real project. Instead, you lean on tools and databases that handle much of it for you. Here is the practical landscape.
The lesson is clear. Understand the strategies deeply, but let proven tools do the heavy routing. Your real job is picking the right shard key and the right strategy for your access patterns. That decision is yours to make, and no tool can make it for you.
Sharding shows up in almost every senior system design interview. Interviewers want to see that you understand the trade-offs, not just the definitions. Here is how to stand out.
A: The three main sharding strategies are range-based, hash-based, and directory-based. Range-based sharding splits keys into continuous ranges and suits time-ordered data. Hash-based sharding runs keys through a hash function to spread load evenly, which is best for point lookups. Directory-based sharding keeps a lookup table that maps each key to a shard, giving the most flexibility for multi-tenant systems.
A: No single strategy is best for every case. Pick range when your queries scan continuous ranges like logs or order history. Pick hash when you mostly do point lookups and want load spread evenly. Pick directory when you need fine control, such as isolating large tenants in a SaaS product. The right choice depends on your access pattern and growth.
A: A good shard key has high cardinality, spreads values evenly, and appears in most of your queries. High cardinality means many distinct values, so data can spread widely. Even distribution avoids hotspots where one shard carries most of the load. Matching your queries means most reads and writes hit one shard instead of every shard.
A: Partitioning splits one large table into smaller parts, usually within a single database. Sharding takes that split across many machines, where each partition lives on its own server called a shard. In short, partitioning is about how you split the data, and sharding is about where the split pieces live.
A: Plain modulo sharding remaps almost every key when you add or remove a shard, forcing a huge data move. Consistent hashing places shards and keys on a virtual ring, so adding or removing a shard moves only a small slice of keys. This makes scaling far smoother, which is why systems like Cassandra and DynamoDB rely on it.
| Interview Insight A classic prompt is: design a URL shortener or a social feed at scale. The moment data outgrows one machine, sharding enters the picture. Walk through it in order: pick the shard key, choose a strategy and justify it against the query pattern, then flag the challenges — cross-shard queries, rebalancing, and hot keys. That structure alone marks you as a strong candidate. |
Sharding is how systems grow past the limits of a single machine. You split the data horizontally, spread the pieces across shards, and use a strategy to route each key to its home. The three classic strategies each fit a different need. Range-based sharding suits continuous and time-ordered queries. Hash-based sharding spreads load evenly for point lookups. Directory-based sharding gives you fine control for multi-tenant systems.
The decision that matters most is the shard key, because it decides whether your load spreads or piles up. Choose a key with high cardinality that matches your queries, then pick the strategy that fits how you read and write. Keep the challenges in mind — cross-shard joins, distributed transactions, rebalancing, and hot keys — and design to avoid them where you can.
Master these ideas, and you will not only build systems that scale, you will also explain your choices with confidence when it counts. In the next articles of this series, we will build on this foundation as we move deeper into distributed data and the patterns that keep it consistent.
To go deeper into these topics, explore the following trusted sources: