Spring Security JWT Flow Explained: From HTTP Request to @PreAuthorize
-
Last Updated: September 14, 2026
-
By: javahandson
-
Series

Understand the Spring Security JWT flow in plain language — from SecurityFilterChain to @PreAuthorize — with a clear diagram and interview tips for Java developers.
The Spring Security JWT flow looks scary at first, but it is one simple story told with long class names. This guide follows one HTTP request from start to finish. It arrives with a bearer token, walks through the filter chain, and ends at the @PreAuthorize check on your controller.
If you are new to the Spring Security JWT flow, the class names alone can push you away. Names like ProviderManager and SecurityContextHolder feel like a wall of jargon. And that is before you write a single line of code.
Here is the good news. Every one of those names is a label for one small job. None of them is magic. Each piece takes an input, does one thing, and hands the result to the next piece. Once you know the job, the name stops being scary.
I have taught this flow to many junior developers. The trick that works every time is simple. Forget the class names first, understand the story, and then attach each name to its part of the story. That is exactly how this article works.
We will walk through the whole journey of a request, one stop at a time. By the end, you will be able to explain each of these pieces in your own words.
We target Spring Boot 3 and Spring Security 6 throughout. The ideas also apply to older versions, but the configuration style has changed.
Imagine you walk into an office building. You go to the security desk and show your ID card. Before you can move around, the guard does a few quick things.
That is the entire idea. Spring Security works almost exactly like this. The only difference is the vocabulary, so let us map the same story to a Spring application.
Keep this picture in your head. Everything else in this article is a name for one piece of it.
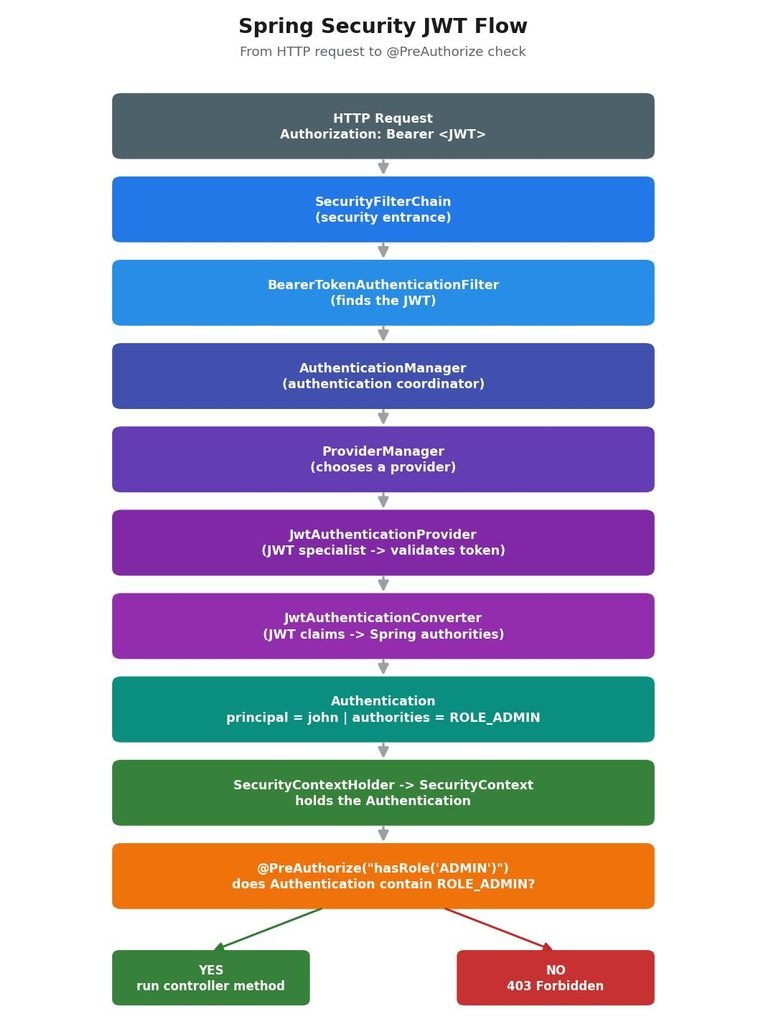
Before we zoom in on each class, let us look at the whole route once. A map makes the details easier to place later. Do not worry if some names are new. We will open every box in the sections that follow.
Here is the path a request takes in a typical JWT resource server. Read it from top to bottom, like a flowchart.
HTTP request  (Authorization: Bearer abc.def.xyz)
      |
      v
SecurityFilterChain                      the security gate
      |
      v
BearerTokenAuthenticationFilter          finds the token
      |
      v
AuthenticationManager (ProviderManager)  coordinates authentication
      |
      v
JwtAuthenticationProvider                verifies the JWT with a JwtDecoder
      |
      v
JwtAuthenticationConverter               turns claims into authorities
      |
      v
Authentication stored in SecurityContextHolder
      |
      v
@PreAuthorize check on the controller method
      |
      v
Controller runs  (or 401 / 403)
Notice the shape. The first half answers one question: who is this caller? The second half answers another: is this caller allowed to do this? Those two questions have proper names, and they matter a lot.
Authentication means proving who you are. Showing your ID card at the front desk is authentication. In our flow, verifying the JWT is authentication.
Authorization means deciding what you may do. The guard at the restricted room handles authorization. In our flow, @PreAuthorize handles authorization.
Why does this split matter? Because the two steps fail in different ways. A failed authentication usually gives a 401. A failed authorization usually gives a 403. Keep that link in mind, and debugging becomes much easier later.
Your Spring application usually does not create the JWT. A separate authorization server does that job. Keycloak, Okta, Auth0 and Azure AD are common examples.
The client logs in with the authorization server and receives a signed token. After that, the client sends the token with every call to your API. Your application plays the role of a resource server. It never sees the password. It only checks the token and trusts what the token says.
This article focuses on the resource server side. That is where all the class names live, and that is where most confusion starts.
Think of the SecurityFilterChain as the security gate in front of your application. Every HTTP request walks through it before it reaches a controller. The chain is simply a list of security filters lined up in a fixed order.
A Spring Boot web app runs inside a servlet container such as Tomcat. Tomcat knows about servlet filters, but it knows nothing about Spring beans. So Spring places a small bridge filter into Tomcat called DelegatingFilterProxy.
That bridge hands the request to a Spring bean called FilterChainProxy. FilterChainProxy then picks the right SecurityFilterChain for the request and runs its filters one by one.
You rarely touch the first two pieces. Spring Boot wires them for you. The part you configure is the SecurityFilterChain itself.
Picture an airport. A passenger goes through the ticket check, then the passport check, then the security scan, and finally the boarding gate. Each check is one filter. The full sequence is the chain.
Order matters here too. You cannot board before the security scan. In the same way, Spring must know who you are before it can decide what you may do. So the authentication filters sit early in the chain, and the AuthorizationFilter sits at the very end.
You describe your chain with a SecurityFilterChain bean. The one below is a common starting point for a JWT API.
@Configuration
@EnableWebSecurity
public class SecurityConfig {

    @Bean
    SecurityFilterChain securityFilterChain(HttpSecurity http) throws Exception {
        http
            .authorizeHttpRequests(auth -> auth
                .requestMatchers("/api/public/**").permitAll()
                .anyRequest().authenticated())
            .oauth2ResourceServer(oauth -> oauth
                .jwt(Customizer.withDefaults()));

        return http.build();
    }
}
Let us read it in plain English. Anyone may call paths under /api/public. Every other request must come from an authenticated caller. And the oauth2ResourceServer line tells Spring to authenticate callers with JWT bearer tokens.
That last line does a lot of quiet work. It adds the bearer token filter to the chain. It also builds a ProviderManager with a JwtAuthenticationProvider inside. We will meet both of them next.
Classic web apps log you in once and remember you in an HTTP session. A JWT API works differently. The client sends the token with every single request, so the server has nothing to remember.
Because of that, many teams add two extra lines to the chain.
http
    .csrf(csrf -> csrf.disable())
    .sessionManagement(session -> session
        .sessionCreationPolicy(SessionCreationPolicy.STATELESS));
The first line turns off CSRF protection. CSRF attacks abuse cookies that the browser sends on its own, and a bearer token in a header does not travel that way. The second line tells Spring never to create a session. Each request stands on its own and brings its own proof.
Now the request reaches the part of the gate that deals with tokens. Something has to read the header and pull the token out. That something is a filter with a long name: BearerTokenAuthenticationFilter.
A client sends the token in the Authorization header, with the word Bearer in front.
GET /api/orders HTTP/1.1
Host: api.example.com
Authorization: Bearer eyJhbGciOiJSUzI1NiJ9.eyJzdWIiOiJqb2huIn0.c2lnbmF0dXJl
The word bearer has a plain meaning. Whoever bears, or carries, this token gets access. That is why you must always send bearer tokens over HTTPS. Anyone who steals the token can use it until it expires.
The name looks heavy, so split it into three parts. Bearer Token, plus Authentication, plus Filter. It is a filter that authenticates requests using bearer tokens. Here is a simplified view of its work.
// Simplified view of BearerTokenAuthenticationFilter
String token = bearerTokenResolver.resolve(request);   // "eyJhbGci..." or null

if (token == null) {
    chain.doFilter(request, response);   // no token: let later filters decide
    return;
}

Authentication authRequest = new BearerTokenAuthenticationToken(token);

try {
    Authentication result = authenticationManager.authenticate(authRequest);

    SecurityContext context = SecurityContextHolder.createEmptyContext();
    context.setAuthentication(result);
    SecurityContextHolder.setContext(context);

    chain.doFilter(request, response);   // carry on to the next filter
} catch (AuthenticationException ex) {
    authenticationEntryPoint.commence(request, response, ex);   // sends a 401
}
Walk through it slowly. A helper called BearerTokenResolver reads the header and strips the Bearer prefix. The filter wraps the raw token in a BearerTokenAuthenticationToken. You can think of that object as an unverified claim that says, here is a token, please check it.
The filter then asks the AuthenticationManager to verify the claim. On success, it stores the result in the SecurityContextHolder and lets the request continue. On failure, it stops right there and returns a 401.
| MEMORY TRICK BearerTokenAuthenticationFilter is the receptionist who takes the ID card from your hand. It does not decide whether the card is real. It finds the credential and passes it to the right people for checking. |
Here is a detail that surprises many people. When a request has no Authorization header at all, this filter does not reject it. It simply lets the request move on.
So who stops it? The AuthorizationFilter at the end of the chain. It sees an anonymous caller hitting a path that needs authentication. It throws an access denied error, and ExceptionTranslationFilter converts that into a 401 response.
This design keeps public endpoints working. A call to /api/public/health carries no token, and it still succeeds because the rules allow anyone in.
The filter now holds an unverified token. Somebody has to coordinate the actual check. That job belongs to the AuthenticationManager and its main helper, ProviderManager.
AuthenticationManager is one of the smallest interfaces in Spring Security. It has a single method.
public interface AuthenticationManager {

    Authentication authenticate(Authentication authentication)
            throws AuthenticationException;
}
The contract is short. You pass in an Authentication that nobody has checked yet, like our bearer token. You get back a verified Authentication filled with the user’s details. If the credentials are bad, the method throws an AuthenticationException instead.
In a JWT resource server you almost never call this method yourself. The filter calls it for you. Still, knowing the contract helps you read stack traces and logs.
This name confuses people more than it should. ProviderManager is simply the most common class that implements AuthenticationManager. Nothing scarier than that.
Why the word Provider? Because it manages a list of AuthenticationProvider objects. Each provider knows how to check one kind of credential.
This split keeps the design clean. The manager never needs to learn how every login type works. It only needs to find a provider that does.
Think of ProviderManager as a hospital receptionist. A patient walks in, and the receptionist sends them to the right doctor. An eye problem goes to the eye doctor. A JWT goes to the JwtAuthenticationProvider. Here is the idea in code.
// Simplified view of ProviderManager.authenticate
for (AuthenticationProvider provider : providers) {
    if (!provider.supports(authentication.getClass())) {
        continue;   // this doctor does not treat this problem
    }
    Authentication result = provider.authenticate(authentication);
    if (result != null) {
        return result;   // first provider with an answer wins
    }
}
throw new ProviderNotFoundException("No AuthenticationProvider found");
Each provider answers a yes or no question through its supports method. Can you handle this type of Authentication? The JWT provider says yes to a bearer token, so the manager hands the token over.
One more detail. A ProviderManager can also have a parent manager. When none of its own providers can help, it asks the parent before giving up. For a simple JWT API you can ignore this, but it explains some setups you will see in larger projects.
Split the name once more. JWT, plus Authentication, plus Provider. It is the specialist that knows how to authenticate a JWT. It does its work in two moves: verify the token, then build the user.
The provider does not parse the token itself. It asks a JwtDecoder to do that part. In Spring Boot, the default decoder is a NimbusJwtDecoder.
// Simplified view of JwtAuthenticationProvider.authenticate
BearerTokenAuthenticationToken bearer = (BearerTokenAuthenticationToken) authentication;

Jwt jwt = jwtDecoder.decode(bearer.getToken());   // verify, or throw

AbstractAuthenticationToken token = jwtAuthenticationConverter.convert(jwt);
return token;   // a JwtAuthenticationToken for the current user
If decode throws, the whole authentication fails and the client gets a 401. If decode returns a Jwt object, the token is trustworthy. The provider then hands that Jwt to a converter, which builds the final Authentication.
A JWT has three parts separated by dots: a header, a payload and a signature. The payload holds claims, which are simple key and value pairs about the user.
{
  "sub": "john",
  "email": "john@example.com",
  "scope": "orders.read orders.write",
  "roles": ["ADMIN", "USER"],
  "iss": "https://auth.example.com/realms/demo",
  "exp": 1767225600
}
Anyone can read these claims, because the payload is only Base64 encoded. What nobody can do is change them without breaking the signature. That is where the decoder earns its keep.
By default, the time checks allow 60 seconds of clock skew between servers. Audience checks are not on by default, so add them when your tokens carry an aud claim that matters.
How does the decoder find the public key? You tell Spring Boot where your authorization server lives.
spring:
  security:
    oauth2:
      resourceserver:
        jwt:
          issuer-uri: https://auth.example.com/realms/demo
With issuer-uri, Spring reads the server’s discovery document and learns the JWK set URL from it. It downloads the public keys and caches them. So your API does not call the authorization server on every request. It verifies each token locally, which keeps things fast.
You can also set jwk-set-uri directly if your server has no discovery document. In that case, Spring skips the issuer lookup and goes straight to the keys.
Let us pause here, because this section matters more than all the class names put together. After verification, Spring stops caring about the raw token. From now on, one object describes the caller: the Authentication.
The Authentication object answers one question. Who is making this request, and what may they do? Here is the interface, trimmed of comments.
public interface Authentication extends Principal, Serializable {

    Collection<? extends GrantedAuthority> getAuthorities();

    Object getCredentials();

    Object getDetails();

    Object getPrincipal();

    boolean isAuthenticated();

    void setAuthenticated(boolean isAuthenticated);
}
Think of it as an employee badge that Spring prints inside your app. For a JWT, the concrete class is JwtAuthenticationToken. It carries something like this.
JwtAuthenticationToken
-------------------------
name:          john
principal:     the Jwt object
authenticated: true
authorities:   ROLE_ADMIN, ROLE_USER
Interestingly, the same interface plays two roles. Before the check, it holds a raw token that nobody has checked yet. After verification it holds a trusted user, like JwtAuthenticationToken. Same contract, different stage of the story.
| INTERVIEW INSIGHT A common interview question asks what matters after authentication finishes. Before authentication, the JWT is what matters. After authentication, the Authentication object is what matters. @PreAuthorize reads the Authentication, not the raw token. Say this clearly and you show real understanding. |
Inside the Authentication, you will keep hearing the word principal. It sounds academic, but it is simple. Principal means the identity of the current user.
In JWT authentication, getPrincipal returns the Jwt object itself. That object holds every claim from the token. Meanwhile, getName returns a short name, and by default it reads the sub claim.
So whenever you read principal, translate it in your head to who you are. Do not overthink it.
Here is another scary name for a tiny idea. A GrantedAuthority is one permission that Spring says this user has. The interface has a single method that returns a string.
public interface GrantedAuthority extends Serializable {

    String getAuthority();
}

GrantedAuthority admin = new SimpleGrantedAuthority("ROLE_ADMIN");
System.out.println(admin.getAuthority()); // Output: ROLE_ADMIN
Why not call it Permission? Because an authority can stand for several kinds of rights, not only roles. Spring keeps the word broad on purpose. When you call getAuthorities on the Authentication, you get the full list of these strings back.
Under the hood, every authority is just a string. The prefix is a naming habit that tells humans what kind of right it is.
A role describes who you are in the business, like an admin or a manager. A scope describes what a client app may do on your behalf, like read orders. Both end up in the same getAuthorities list, and Spring compares them as plain strings.
Now we hit an important puzzle. A JWT describes permissions in its own style. Spring Security wants authorities in its own style. Somebody has to translate between the two, and that somebody is JwtAuthenticationConverter.
Out of the box, the converter looks for a claim named scope or scp. It splits the values and adds the SCOPE_ prefix to each one.
JWT claim:    "scope": "orders.read orders.write"
                          |
                          v   JwtAuthenticationConverter (default)
                          |
Authorities:  SCOPE_orders.read, SCOPE_orders.write
Notice what the default ignores. The roles claim in our sample token produces nothing. So a user whose token says roles ADMIN still has no ROLE_ADMIN authority. This single fact causes more JWT bugs than anything else in Spring Security.
When your authorization server puts roles in a custom claim, tell the converter where to look. You set up a small helper that reads that claim, then plug it into the converter.
@Bean
JwtAuthenticationConverter jwtAuthenticationConverter() {
    JwtGrantedAuthoritiesConverter authorities = new JwtGrantedAuthoritiesConverter();
    authorities.setAuthoritiesClaimName("roles");   // read the roles claim
    authorities.setAuthorityPrefix("ROLE_");        // ADMIN becomes ROLE_ADMIN

    JwtAuthenticationConverter converter = new JwtAuthenticationConverter();
    converter.setJwtGrantedAuthoritiesConverter(authorities);
    return converter;
}
Then wire it into the chain in place of the defaults.
.oauth2ResourceServer(oauth -> oauth
    .jwt(jwt -> jwt.jwtAuthenticationConverter(jwtAuthenticationConverter())))
Now our sample token gives ROLE_ADMIN and ROLE_USER. Keep one trade-off in mind. This setup reads only the roles claim, so the scope values stop turning into authorities. If you need both, write a small converter that merges the two lists.
The converter also decides what getName returns. By default, that is the sub claim. Some tokens use sub for an opaque id, and you would rather see an email or a username.
converter.setPrincipalClaimName("email");

// authentication.getName()  ->  john@example.com
This change only affects the short name. The principal object stays the full Jwt, so every other claim remains available.
Spring has now authenticated John and knows his authorities. But where does it keep this information while the rest of the request runs? Two classes share that job, and their names almost explain themselves.
Think of the SecurityContext as a small box. Inside the box sits exactly one Authentication object. Think of the SecurityContextHolder as the shelf where Spring keeps the box.
SecurityContextHolder          the shelf
        |
        v
SecurityContext                the box
        |
        v
Authentication                 the badge
       /        \
principal      authorities
(Jwt: john)    ROLE_ADMIN, ROLE_USER
If you remember only one structure from this whole article, make it this nesting. You will see it in logs, in tests and in real code again and again.
By default, the holder keeps the box in a ThreadLocal. Each thread gets its own private box. Tomcat serves each request on a thread, so each request sees only its own user.
That design brings two useful promises. Two users hitting your API at the same moment never see each other’s details. And Spring clears the box when the request finishes, so the next request on that thread starts empty.
It also brings one trap. If your code starts a new thread, that thread gets an empty box. We will look at that problem in the pitfalls section.
You can reach the current user from anywhere in the request with one chain of calls.
Authentication authentication = SecurityContextHolder
        .getContext()
        .getAuthentication();

System.out.println(authentication.getName());        // Output: john
System.out.println(authentication.getAuthorities()); // Output: [ROLE_ADMIN, ROLE_USER]
Read it in plain English. Ask the shelf for its box, then ask the box for its badge. In a controller, you have an even cleaner option. Spring can inject the pieces straight into your method.
@GetMapping("/api/me")
public String me(@AuthenticationPrincipal Jwt jwt, Authentication authentication) {
    return authentication.getName() + " " + jwt.getClaimAsString("email");
}
// Output: john john@example.com
Prefer injection in controllers. It keeps your code easy to test, because a test can pass in any Authentication it likes.
By now Spring knows who you are and what you may do. The last piece is the actual permission check on a method. That is the job of @PreAuthorize.
@PreAuthorize does nothing until you switch method security on. In Spring Security 6, you add one annotation to a configuration class.
@Configuration
@EnableWebSecurity
@EnableMethodSecurity
public class SecurityConfig {
    // SecurityFilterChain bean from earlier
}
This annotation replaced an older one from Spring Security 5. It turns on @PreAuthorize and @PostAuthorize by default. Forget this annotation, and every @PreAuthorize in your project silently stops working.
Take a typical protected method.
@PreAuthorize("hasRole('ADMIN')")
public void deleteOrder(Long orderId) {
    orderRepository.deleteById(orderId);
}
Spring wraps your bean in a proxy. When a caller invokes deleteOrder, the call hits the proxy first. The proxy reads the current Authentication from the SecurityContextHolder and evaluates the expression against it.
The expression language is SpEL, the Spring Expression Language. That is why the value looks like a small piece of code inside a string.
SpEL can also read method arguments and the current user. That lets you write rules like, admins may view any profile, but users may view only their own.
@PreAuthorize("hasRole('ADMIN') or #username == authentication.name")
public Profile getProfile(String username) {
    return profileService.load(username);
}
The #username part refers to the method argument. The authentication part refers to the current Authentication object. So John can load his own profile, and an admin can load anyone’s.
You can combine checks with and, or and not. Keep the expressions short, though. When a rule grows long, move it into a bean method and call that bean from the expression.
This pair trips up almost every beginner. Both check the authorities on the Authentication. The only real difference is how they treat the ROLE_ prefix.
The hasAuthority check compares the exact string you pass. In contrast, hasRole adds the ROLE_ prefix for you when your value lacks it.
@PreAuthorize("hasRole('ADMIN')")              // looks for ROLE_ADMIN
@PreAuthorize("hasAuthority('ROLE_ADMIN')")    // looks for ROLE_ADMIN
@PreAuthorize("hasAuthority('SCOPE_orders.read')")  // looks for SCOPE_orders.read
The first two lines behave the same. The third one shows why hasAuthority exists. A scope has no ROLE_ prefix, so hasRole cannot express it cleanly.
What about hasRole(‘ROLE_ADMIN’) inside @PreAuthorize? It still works, because Spring spots the existing prefix and leaves it alone. It is redundant, though. URL rules are stricter: calling hasRole(“ROLE_ADMIN”) in authorizeHttpRequests makes the app fail at startup.
| Point | hasRole | hasAuthority |
|---|---|---|
| Prefix handling | Adds ROLE_ when missing | Uses the exact string |
| Typical value | ‘ADMIN’ | ‘ROLE_ADMIN’ or ‘SCOPE_orders.read’ |
| Works for scopes | No | Yes |
| Multiple values | hasAnyRole(‘ADMIN’, ‘USER’) | hasAnyAuthority(‘SCOPE_a’, ‘SCOPE_b’) |
| Best for | Business roles | Scopes and fine-grained permissions |
Start by checking what your authorities actually look like. Print getAuthorities once, and the answer becomes obvious.
A team that picks one style and sticks to it avoids a whole class of bugs.
Once the flow makes sense, the two error codes make sense too. Each one points to a different half of the story. So the status code alone tells you where to start looking.
A 401 means Spring could not work out who you are. Authentication failed, or it never happened.
For a bearer token failure, Spring adds a WWW-Authenticate header that explains the problem.
HTTP/1.1 401 Unauthorized
WWW-Authenticate: Bearer error="invalid_token", error_description="Jwt expired at 2026-09-13T10:15:30Z"
A 403 means Spring knows exactly who you are, but you lack the right authority. Authentication worked. Authorization said no.
HTTP/1.1 403 Forbidden
WWW-Authenticate: Bearer error="insufficient_scope", error_description="The request requires higher privileges than provided by the access token."
So when you get a 403 with a valid token, stop checking the token. The problem lives in your authorities or your expression.
| Status | Meaning | Failed step | Where to look |
|---|---|---|---|
| 401 Unauthorized | We do not know you | Authentication | Header, signature, expiry, issuer |
| 403 Forbidden | We know you, but you cannot do this | Authorization | Converter, authorities, @PreAuthorize expression |
Now let us rebuild the full story with one small but complete example. We will write the configuration, add a controller, and then trace a real request through every class we met.
This class brings together everything from the earlier sections: the chain, stateless sessions, the custom converter and method security.
@Configuration
@EnableWebSecurity
@EnableMethodSecurity
public class SecurityConfig {

    @Bean
    SecurityFilterChain securityFilterChain(HttpSecurity http) throws Exception {
        http
            .csrf(csrf -> csrf.disable())
            .sessionManagement(session -> session
                .sessionCreationPolicy(SessionCreationPolicy.STATELESS))
            .authorizeHttpRequests(auth -> auth
                .requestMatchers("/api/public/**").permitAll()
                .anyRequest().authenticated())
            .oauth2ResourceServer(oauth -> oauth
                .jwt(jwt -> jwt.jwtAuthenticationConverter(jwtAuthenticationConverter())));

        return http.build();
    }

    @Bean
    JwtAuthenticationConverter jwtAuthenticationConverter() {
        JwtGrantedAuthoritiesConverter authorities = new JwtGrantedAuthoritiesConverter();
        authorities.setAuthoritiesClaimName("roles");
        authorities.setAuthorityPrefix("ROLE_");

        JwtAuthenticationConverter converter = new JwtAuthenticationConverter();
        converter.setJwtGrantedAuthoritiesConverter(authorities);
        return converter;
    }
}
Add the issuer-uri property from section 6.3, and the configuration is complete. No custom filter, no manual token parsing, and no hand-written signature code.
Here is a small controller with one open endpoint and one admin-only endpoint.
@RestController
@RequestMapping("/api")
public class ReportController {

    @GetMapping("/public/health")
    public String health() {
        return "UP";
    }

    @GetMapping("/admin/report")
    @PreAuthorize("hasRole('ADMIN')")
    public String report(Authentication authentication) {
        return "Report for " + authentication.getName();
    }
}
// GET /api/public/health  ->  Output: UP
// GET /api/admin/report   ->  Output: Report for john
The health endpoint needs no token. The report endpoint needs a valid token and the ROLE_ADMIN authority.
Imagine John calls the report endpoint with a valid token whose roles claim holds ADMIN and USER.
Read that list a few times. Every class name in the article appears exactly where it does its one job.
Now change one thing at a time and watch where the story breaks.
That is the real value of knowing the flow. A status code stops being a mystery. It tells you which step broke.
Most JWT security bugs come from a handful of repeat mistakes. Each one below has cost real teams hours of debugging.
You add hasRole(‘ADMIN’), send a token with a roles claim, and get a 403. The token is fine. The default converter only reads scope and scp, so the user has SCOPE_ authorities and no roles at all.
Fix it by configuring JwtAuthenticationConverter as shown in section 8.2. Then log getAuthorities once to confirm the result.
Your @PreAuthorize annotations look perfect, yet every user can call every method. There is no error and no warning. Method security was simply never switched on.
Add @EnableMethodSecurity to one of your config classes. A quick test that calls a protected method with a low-privilege user catches this mistake early.
Spring enforces @PreAuthorize through a proxy. When one method calls another method on the same object, the call skips the proxy.
public void exportAll() {
    deleteOrder(42L);   // same class: the proxy never sees this call
}

@PreAuthorize("hasRole('ADMIN')")
public void deleteOrder(Long orderId) { ... }
Here, deleteOrder runs without any check. Move the secured method into a separate bean, or put the annotation on the public method that outside callers use.
The SecurityContextHolder lives in a ThreadLocal. When you hand work to a new thread or a plain executor, that thread starts with an empty context.
Executor plain = Executors.newFixedThreadPool(4);
Executor secure = new DelegatingSecurityContextExecutor(plain);

secure.execute(() ->
    System.out.println(SecurityContextHolder.getContext().getAuthentication().getName()));
// Output: john
This wrapper copies the caller’s context onto the new thread. Use it, or a similar wrapper, whenever async code needs the current user.
In URL rules, hasRole(“ROLE_ADMIN”) throws an IllegalArgumentException when the app starts. Spring insists that you drop the prefix there. Write hasRole(“ADMIN”), or switch to hasAuthority(“ROLE_ADMIN”) if you prefer the full string.
A 403 with a valid token sends many developers back to the token, which wastes time. Remember the rule from section 12. A 401 points at authentication. A 403 points at authorization.
| INTERVIEW INSIGHT A strong answer to “why are my roles not working?” is to trace the flow out loud. Check the token first, then the converter, then the authorities on the Authentication object, and finally the @PreAuthorize expression. Naming that order shows you understand the pipeline, not just one class. |
Do not memorize a dozen separate definitions. That path leads to confusion under interview pressure. Instead, group the names into four small buckets, and let each bucket answer one question in the story.
How does the request get in, and where is the token? This bucket holds the gate and the receptionist.
Is the token real, and who does it belong to? This bucket does the heavy checking.
What does Spring know about the caller? This bucket describes the badge.
Where does the badge live, and who reads it? This bucket closes the story.
Learn the four buckets first. After that, each name slots into place, because you already know where it lives in the story.
A: It is the ordered set of security filters every HTTP request passes through before reaching your controller. Think of it as the security gate at the entrance of your application, checking each request in sequence.
A: It reads the Authorization header, strips the Bearer prefix and wraps the token in a BearerTokenAuthenticationToken. It then asks the AuthenticationManager to verify it. On success it stores the result in the SecurityContextHolder. On failure it calls the authentication entry point, which returns a 401. When no token exists, it lets the request continue so that public endpoints still work.
A: AuthenticationManager is an interface with one method, authenticate. ProviderManager is its most common implementation. It holds a list of AuthenticationProvider objects and asks each one whether it supports the incoming Authentication type. The first provider that returns a result wins, and a parent manager can act as a fallback.
A: It takes the bearer token and passes it to a JwtDecoder. The decoder verifies the signature and checks the expiry, the not-before time and the issuer. After that, the provider uses a JwtAuthenticationConverter to turn the verified Jwt into a JwtAuthenticationToken with the right authorities.
A: It translates JWT claims into Spring Security authorities. Out of the box it reads the scope claim. Once you point it at a roles claim like [“ADMIN”,”USER”], it turns those values into ROLE_ADMIN and ROLE_USER so the rest of Spring Security can use them.
A: The default JwtAuthenticationConverter reads only the scope or scp claim and adds the SCOPE_ prefix. It ignores custom claims such as roles. To get ROLE_ authorities, configure a JwtGrantedAuthoritiesConverter with your claim name and the ROLE_ prefix, then plug it into the resource server configuration.
A: The principal represents the current user’s identity. For a JwtAuthenticationToken, getPrincipal returns the full Jwt object, so you can read any claim. Its getName method returns a short name. That name comes from the sub claim unless you pick another claim on the converter.
A: Inside the SecurityContext, which is held by the SecurityContextHolder. The nesting is SecurityContextHolder to SecurityContext to Authentication, and the Authentication holds the principal and the authorities.
A: hasRole automatically adds the ROLE_ prefix, so hasRole(‘ADMIN’) checks for ROLE_ADMIN. hasAuthority checks the exact string you pass, with no prefix added. Use hasAuthority for scopes like SCOPE_orders.read.
A: A 401 Unauthorized means the token is missing or invalid, so the user is not authenticated. A 403 Forbidden means the user is authenticated but lacks the required authority. So a 403 with a valid token points to a roles problem, not a token problem.
A: The usual cause is a missing @EnableMethodSecurity annotation. Another common cause is self-invocation. Spring checks @PreAuthorize through a proxy, so a call from one method to another inside the same class skips the check entirely.
A: No. With issuer-uri or jwk-set-uri, Spring downloads the public keys and caches them. It verifies each token’s signature locally. It fetches the keys again only when it needs to, for example after the authorization server rotates them.
Let us wrap up what we covered. The Spring Security JWT flow is one guard-at-the-gate story wearing a lot of long names. A request enters the SecurityFilterChain. BearerTokenAuthenticationFilter finds the token and hands it to the AuthenticationManager.
ProviderManager sends the token to the JWT provider. A JwtDecoder verifies the signature, expiry and issuer. JwtAuthenticationConverter then turns the claims into authorities, and Spring builds an Authentication object with a principal and a list of GrantedAuthority values.
That Authentication goes into a SecurityContext, which lives in the SecurityContextHolder for the length of the request. Finally, @PreAuthorize reads it and uses hasRole or hasAuthority to allow or block the call. A 401 means authentication broke. A 403 means authorization said no.
My advice is simple. Build a tiny resource server, point it at a test authorization server, and print the current Authentication in a controller. Seeing your own name and authorities appear makes the whole flow click for good.