JDK 11 installation on Windows
-
Last Updated: September 5, 2023
-
By: javahandson
-
Series
Learn Java in a easy way

In this article, we are going to learn about JDK 11 installation on Windows systems. We will also learn how to set the JAVA_HOME path to run the Java commands.
JDK or Java Development KIT is used for developing Java applications using Java programming language.
The name says development kit which means this kit includes tools that can be used for developing, testing and executing the Java applications.
As a developer, we need the tools to develop and execute the application which is the reason we have to install JDK on our system. If we were not a developer and we just wanted to execute the application then we could have just installed Java Runtime Environment i.e. JRE.
JRE = Java Virtual Machine i.e. JVM + Set of Libraries ( Ex. rt.jar )
JDK = JRE + Development tools ( Compiler, predefined libraries etc. )
Java Runtime Environment i.e. JRE – It is a runtime environment to execute the Java program.
Java Compiler – OS cannot understand the high-level language hence using Java compiler we can convert the high-level code to low-level code which is also known as byte code.
Java predefined libraries – These are the set of libraries provided by Java so that we can develop our own user-defined applications using these predefined libraries.
1. Visit the below-trusted Oracle page to download JDK 11
https://www.oracle.com/in/java/technologies/javase/jdk11-archive-downloads.html

2. We have to click on the download link of JDK 11. Once we click on that link we will be delegated to the Oracle Sign-In page. If we already have an Oracle account then we have to use those credentials. If we do not have an account then we have to create a new Oracle account.

3. Once we enter the credentials JDK will be downloaded.
4. Go to the downloads folder and click on jdk-11.0.18_windows-x64_bin.exe file ( or any other version that you have downloaded ) to start the installation process.

5. Once installation starts we will get an option to change the installation directory. If we want to change the installation directory then we can change it by clicking on the change button. But better to keep the default installation directory. Then click on Next.

6. Once we click on Next the JDK will be installed in our system.


7. Now we will check the Java version. On the command prompt, we will run the below command
java -version
Output: 'java' is not recognized as an internal or external command, operable program, or batch file.
The Operating system is not able to recognize Java hence we have to set the Java path.
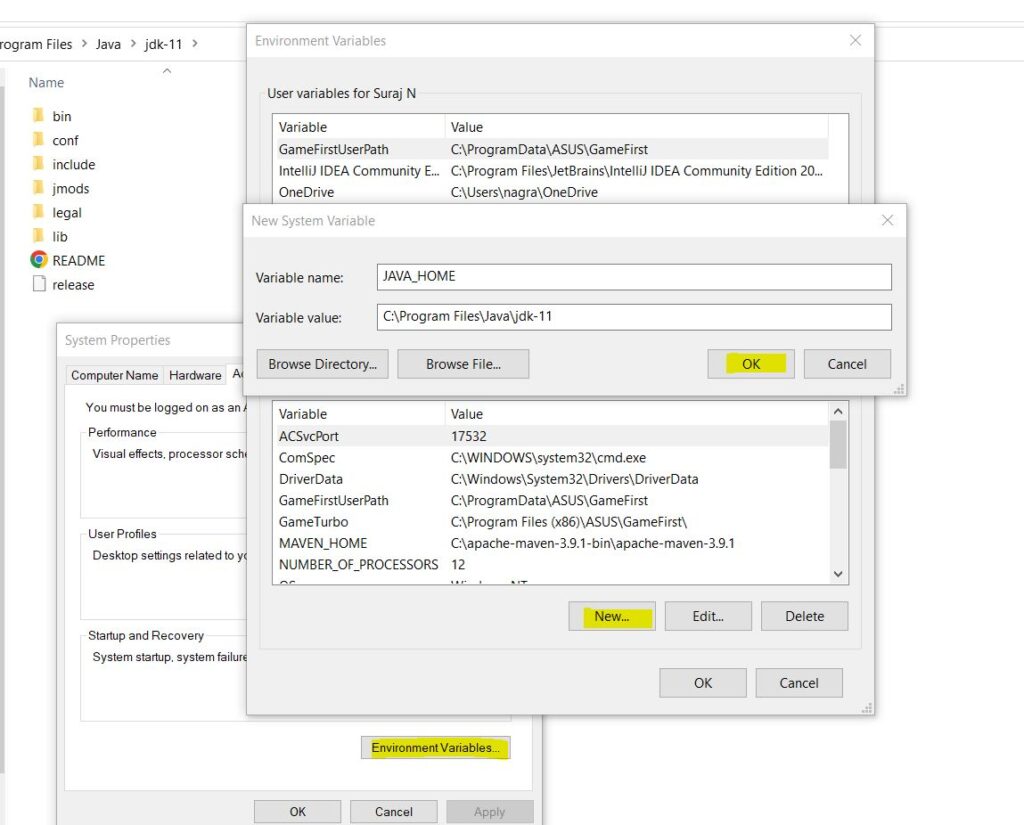
1. Right click on This PC > Properties > Advanced System Settings > Environment Variables

2. Create a new System variable with the name JAVA_HOME and the value will be the path where the Java is installed.

3. Now we will update the value of the path variable with JAVA_HOME “/” bin and save.

4. Now we will open a new command prompt window and run the same command. This time we will be able to see the Java version.
java -version
Output : java version "11.0.18" 2023-01-17 LTS
Java(TM) SE Runtime Environment 18.9 (build 11.0.18+9-LTS-195)
Java HotSpot(TM) 64-Bit Server VM 18.9 (build 11.0.18+9-LTS-195, mixed mode)
5. We will test this by running a simple Java program
public class Test {
    public static void main(String[] args) {
        System.out.println("Hello Developer");
    }
}
> javac Test.java
> java Test
Output : Hello Developer
So this is all about JDK 11 installation on Windows systems. I hope you liked this article. If you have any questions on this topic please add them below in the comment section. Thank you for reading this article.