JDK 11 installation on Windows
-
Last Updated: September 5, 2023
-
By: javahandson
-
Series

JDK 11 installation on Windows, step by step: download Oracle or free OpenJDK/Temurin, set JAVA_HOME and Path, fix the “java is not recognized” error, and verify.
Every Java journey starts the same way. You need a JDK on your machine before you can write a single line of code. No JDK, no compiler. No compiler, no program.
The install itself takes about two minutes. Yet beginners still get stuck, and almost always at the same spot. They finish the installer, open a terminal, type java -version, and Windows shrugs back with an error.
Nothing broke. Windows simply does not know where you put Java. Once you tell it, everything clicks into place. That single idea explains most of the pain around setting up Java on Windows.
So we will do the whole thing slowly and carefully. Download, install, configure, verify, then run real code. Along the way you will also learn why each step matters, because copy-paste setup instructions fall apart the moment something goes wrong.
Here is the plan for the rest of the guide:
You need zero Java knowledge to follow along. Basic comfort with Windows folders is enough.
JDK stands for Java Development Kit. Read that name literally, because it tells you exactly what the thing does. It is a kit, and it holds the tools a developer needs.
Those tools let you write Java code, turn it into a runnable form, and then execute it. Oracle bundles them into one installer so you do not hunt for pieces one by one.
Open the JDK folder later and you will find dozens of small programs. Most beginners only ever touch two or three of them. Here are the ones worth knowing:
On top of the tools you also get the standard library. Classes like String, ArrayList, and HashMap all live there. You never write them yourself; you simply import and use them.
These three names confuse almost everyone at first. They sound similar, yet they sit at three different levels. Think of them as boxes inside boxes.
The JVM sits at the centre. It runs bytecode, and nothing else. Wrap the JVM together with the core libraries and you have the JRE, which can run a finished Java application. Wrap the JRE together with the compiler and the other developer tools and you have the JDK.
Two tiny equations capture the whole idea:
JRE = JVM + core libraries (String, List, Math, IO, ...)
JDK = JRE + development tools (javac, jar, javadoc, jshell, ...)
| Item | Full name | What it does | Can it compile? | Who needs it |
|---|---|---|---|---|
| JVM | Java Virtual Machine | Executes bytecode on your OS | No | Nobody installs it alone |
| JRE | Java Runtime Environment | JVM plus the standard libraries | No | Users who only run Java apps |
| JDK | Java Development Kit | JRE plus compiler and dev tools | Yes | Every Java developer |
One more detail catches people out. Since Java 11, Oracle no longer ships a separate JRE download. The JDK is the only package you install, and it already contains everything a runtime needs.
Your CPU cannot read Java source code. It understands machine instructions, not public static void main. Something must translate.
That translator is javac, and it only ships with the JDK. Feed it a .java file and it hands back a .class file. Bytecode fills that file: a compact, low-level format the JVM understands on any operating system.
Then the java launcher takes over. It boots a JVM, loads your class, and executes the bytecode. Windows, macOS, Linux — same bytecode, different JVM. People call that “write once, run anywhere”, and the JDK is what makes it possible on your machine.
Five minutes of checking now saves an hour of confusion later. Run through this short list before you download anything.
JDK 11 runs happily on Windows 10 and Windows 11. Older builds such as Windows 8.1 still work, though Microsoft no longer supports them.
Architecture matters more. Oracle ships JDK 11 for Windows as a 64-bit build only, so a 32-bit copy of Windows will not run it. Confirm your architecture first:
A quick terminal check does the same job:
echo %PROCESSOR_ARCHITECTURE%
Output: AMD64
AMD64 means 64-bit, even on an Intel chip. Do not let the name mislead you.
The installer itself weighs around 150 MB. Unpacked, the JDK takes roughly 300 MB on disk. Keep about 1 GB free and you will have plenty of room for the download, the install, and your first projects.
Admin rights come next. The default install folder sits under C:\Program Files\Java, and Windows guards that folder. Without an administrator account, the installer stops with a permission error.
Locked out of admin on a work laptop? You still have options:
Oracle’s download page lists several files, and the names look almost identical. For a normal Windows setup you want the x64 Installer, something like jdk-11.0.18_windows-x64_bin.exe.
Skip the rest for now:
Always download from Oracle directly. Random mirror sites bundle junk, and a compiler is the last place you want a surprise.
JDK 11 lives on Oracle’s archive page, because newer releases now sit on the main download page. Open the link below and scroll to the Windows section.
https://www.oracle.com/in/java/technologies/javase/jdk11-archive-downloads.html
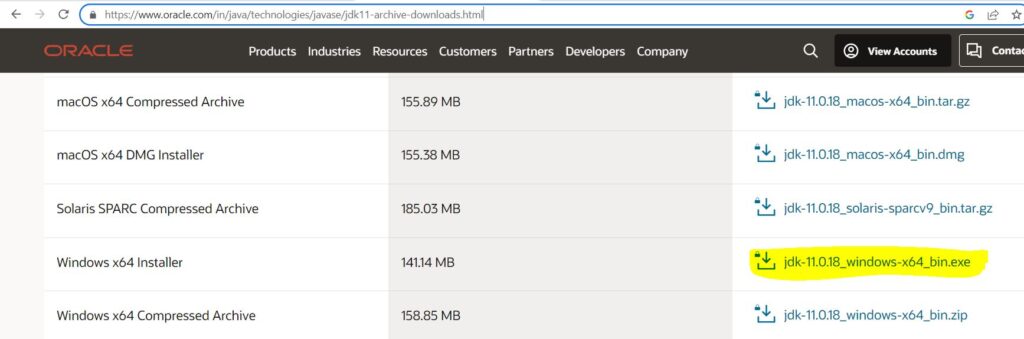
Find the row that says Windows x64 Installer. Click the file name beside it. A licence checkbox may appear first, so tick it and continue.
Oracle now asks you to sign in before the archive download starts. Annoying, yes, but harmless.

Already have an Oracle account? Enter those credentials and carry on. Otherwise click Create Account, fill the short form, and verify your email. The whole detour costs two minutes, and you keep the account for future downloads.
After sign-in the download begins on its own. Your browser drops the file into the Downloads folder, usually as jdk-11.0.18_windows-x64_bin.exe.
Your version number may differ, and that is completely fine. Oracle patches JDK 11 regularly, so 11.0.20 or 11.0.22 works exactly the same way. Only the digits after the dot change.
Now comes the easy part. The installer asks almost nothing, and the defaults suit most people.
Open your Downloads folder and double-click the .exe file. Windows shows a User Account Control prompt, so click Yes. The welcome screen appears next.
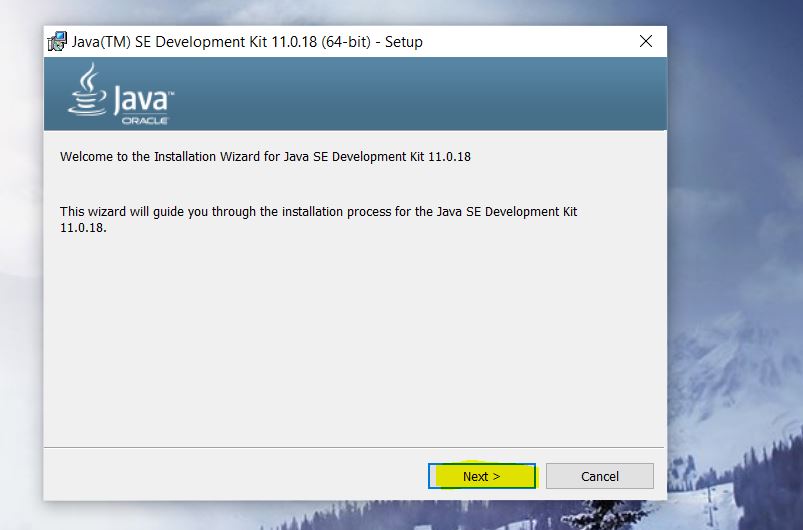
Click Next to move on.
The next screen offers a destination folder. By default the installer suggests something like C:\Program Files\Java\jdk-11.0.18\.

Keep the default unless you have a good reason to change it. Every tutorial, including this one, assumes that path.
Do write the folder down, though. You will type it again in a few minutes when you create JAVA_HOME. A wrong path there causes most setup failures.
Then press Next.
Files start copying. A progress bar crawls across the window for twenty or thirty seconds.

When the bar fills, a “Successfully Installed” screen appears. Click Close.

Java now lives on your disk. It just cannot hear you yet, and section 6 explains why.
Curious about what the installer copied? Open C:\Program Files\Java\jdk-11.0.18 and look around. The layout is simple:
C:\Program Files\Java\jdk-11.0.18\
    bin\      java.exe, javac.exe, jar.exe, jshell.exe ...
    lib\      the platform modules and internal libraries
    conf\     editable config files (security, logging, networking)
    include\  C headers, used when native code calls into Java
    jmods\    the compiled module files that make up the platform
    legal\    licences
    release   a small text file describing this build
Three of those folders matter to you:
Notice what is missing. JDK 11 has no rt.jar, and it has no separate jre subfolder either. Java 9 replaced both with the module system, so older tutorials that mention rt.jar are simply out of date.
This section explains the single most common beginner error. Read it once and you will never fear that message again.
Open Command Prompt and ask Java to identify itself:
java -version
Output: 'java' is not recognized as an internal or external command,
operable program or batch file.
Frustrating, right? You just installed Java. Nothing is broken, though. The file java.exe genuinely exists on your disk, and you can prove it:
"C:\Program Files\Java\jdk-11.0.18\bin\java.exe" -version
Output: java version "11.0.18" 2023-01-17 LTS
Give Windows the full address and Java answers instantly. So the program works. Windows just cannot find it by its short name.
Type java and Windows does something very mechanical:
Windows never searches your whole hard drive. That would take forever. It only looks in the folders you listed.
Path is nothing magical. It is one long environment variable holding folder names separated by semicolons:
C:\Windows\system32;C:\Windows;C:\Program Files\Git\cmd;%JAVA_HOME%\bin
Adding the JDK’s bin folder to that list makes java, javac, and friends usable from any directory. That single change fixes the error above.
JAVA_HOME plays a different role. Windows itself ignores it completely; other programs read it.
It points at the root of your JDK, not at bin:
JAVA_HOME = C:\Program Files\Java\jdk-11.0.18       (correct)
JAVA_HOME = C:\Program Files\Java\jdk-11.0.18\bin   (wrong)
Maven, Gradle, Tomcat, Jenkins, and many IDEs all look for JAVA_HOME. When they find it they know exactly where the compiler and the platform libraries live. When they do not, they refuse to start.
People often ask why one variable is not enough. Here is the short answer:
| Variable | Who reads it | Points to | What breaks without it |
|---|---|---|---|
| Path | Windows itself | The JDK’s bin folder | java and javac stop working in the terminal |
| JAVA_HOME | Maven, Gradle, Tomcat, IDEs | The JDK root folder | Build tools and servers fail to launch |
There is a neat trick that links them. Write the Path entry as %JAVA_HOME%\bin rather than a hard-coded folder. Later, when you upgrade to Java 17 or 21, you edit JAVA_HOME once and Path follows automatically.
Time for the part that actually fixes the error. Follow these four steps in order.
Right-click This PC, choose Properties, then Advanced system settings, then the Environment Variables button.
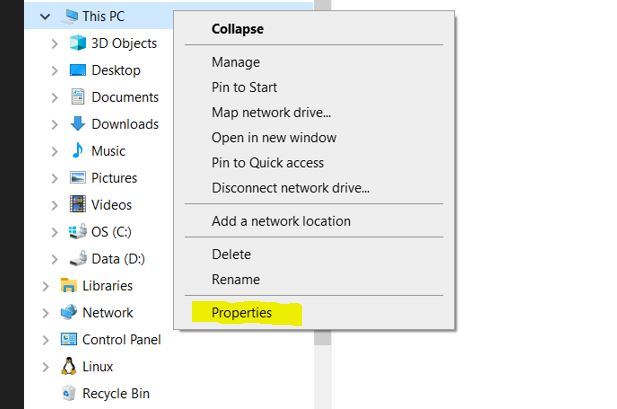
A faster route exists. Press Windows, type env, and pick “Edit the system environment variables”. Same dialog, fewer clicks.
You will see two panels. The top one lists user variables, which affect only your account. The bottom one lists system variables, which affect everyone. Use system variables if you have admin rights, and user variables if you do not.
Click New under System variables and fill the two boxes:
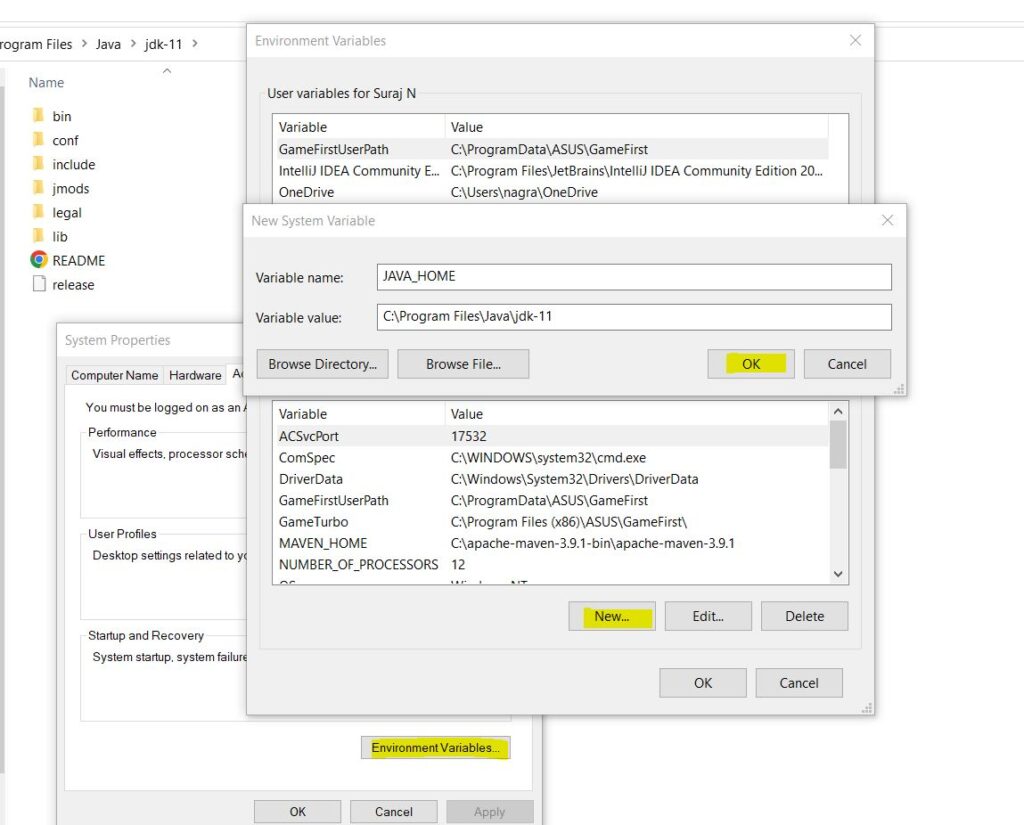
Match the value to your real folder, digit for digit. Easiest way: open the folder in Explorer, click the address bar, and copy the path straight out of it.
Three rules keep you out of trouble here:
Click OK to save.
Select Path in the System variables list, then click Edit. A list of folders opens. Click New and type:
%JAVA_HOME%\bin
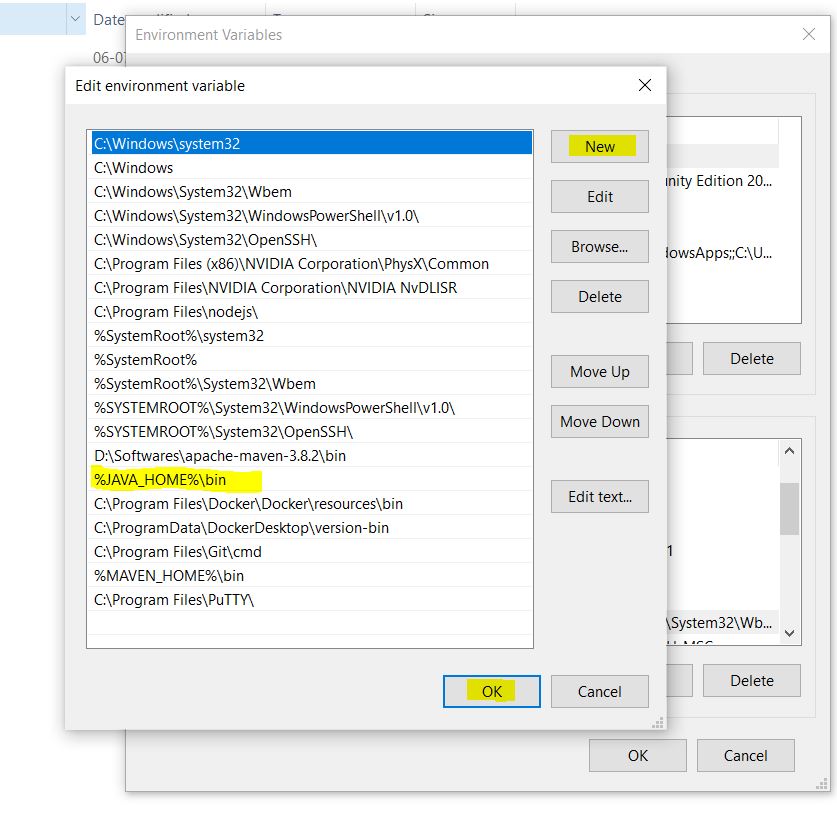
Windows expands %JAVA_HOME% at runtime, so the entry always tracks whatever JAVA_HOME currently holds.
Now use the Move Up button to push that entry near the top. Order decides the winner when several Java folders appear in Path, and Oracle’s old C:\ProgramData\Oracle\Java\javapath entry loves to squat there.
Click OK on all three dialogs. Closing them properly matters, because Windows only commits the change on the final OK.
This step sounds trivial and trips up half of all beginners. Close every Command Prompt, PowerShell, and terminal window you already had open.
Why? A process reads the environment once, at birth. Old windows keep their old copy forever, so your shiny new JAVA_HOME simply does not exist inside them.
Open a brand new Command Prompt and move on to verification.
Four quick commands prove the setup end to end.
Start with the runtime:
java -version
Output: java version "11.0.18" 2023-01-17 LTS
Java(TM) SE Runtime Environment 18.9 (build 11.0.18+9-LTS-195)
Java HotSpot(TM) 64-Bit Server VM 18.9 (build 11.0.18+9-LTS-195, mixed mode)
Now check the compiler as well. Beginners skip this one and regret it, because a JRE-only setup runs code yet refuses to compile it.
javac -version
Output: javac 11.0.18
Both commands answering with 11.x? Your JDK works.
Print JAVA_HOME to make sure Windows really stored it:
echo %JAVA_HOME%
Output: C:\Program Files\Java\jdk-11.0.18
An empty line, or the literal text %JAVA_HOME%, means the variable never saved. Go back to step 8 and check for a typo.
Machines often carry more than one Java. This command reveals every copy Windows can see, in priority order:
where java
Output: C:\Program Files\Java\jdk-11.0.18\bin\java.exe
Several lines came back? The top one is the one that runs. Should the wrong copy sit first, reorder your Path entries and try again. Keep where java in your back pocket; it settles arguments fast.
Version numbers only prove so much. Compiling and running real code proves everything.
Create a folder such as C:\java-practice. Inside it, save a file named Test.java with exactly this content:
public class Test {
    public static void main(String[] args) {
        System.out.println("Hello Developer");
    }
}
The file name must match the class name, letter for letter. Test.java holds class Test. Notepad users beware: it loves to append a hidden .txt, so save with the file type set to “All Files”.
Open a terminal in that folder and fire off two commands:
cd C:\java-practice
javac Test.java
java Test
Output: Hello Developer
Seeing “Hello Developer” on screen? Congratulations. Your JDK 11 installation on Windows works from end to end, and you just compiled and ran your first Java program.
Notice the second command carefully. You type java Test, not java Test.class. The launcher wants the class name, and it adds the extension itself.
Those two little commands hide the whole Java pipeline:
Run dir in the folder and you will spot both files sitting there. Source in, bytecode out. Every Java build, however large, boils down to that same loop.
Your terminal works. Your IDE, however, keeps its own JDK setting, and it does not always agree with the terminal. Check it once now.
Open File > Project Structure > Project and look at the SDK dropdown. JDK 11 should appear there. If the list looks empty, click Add SDK > JDK and browse to your JDK root folder, the same one you used for JAVA_HOME.
Set the Language level to 11 as well. Otherwise IntelliJ happily compiles with an older language level and confuses you later.
Head to Window > Preferences > Java > Installed JREs. Click Add, choose Standard VM, and browse to the JDK root folder.
Eclipse then lists the new entry. Tick its checkbox to make it the default for every new project. One warning: point Eclipse at the JDK, never at a bare JRE, or the compiler settings will misbehave.
VS Code needs the Extension Pack for Java. After installing it, open the Command Palette and run Java: Configure Java Runtime. The panel shows which JDK VS Code found, and you can point it elsewhere from there.
Something still misbehaving? Work through this list. One of these five almost certainly explains it.
This is the error almost everyone hits first. I hit it too. It looks scary, but it means one simple thing: Windows has no idea where your JDK lives. The install worked fine. Windows just can’t find java.exe yet.
Here’s why. When you type java, Windows doesn’t search your whole disk. It only looks inside the folders listed in your Path variable. If the JDK’s bin folder isn’t on that list, Windows shrugs and throws this error.
So let’s fix it. Work through these checks in order and stop at the one that solves it.
a. Look at your Path.
Open a terminal and run:
echo %PATH%
Scan the output for a Java entry, something ending in \bin. Don’t see one? Then %JAVA_HOME%\bin never made it onto your Path. Go back and redo Step 7.
b. Confirm java.exe is actually there.
Open File Explorer and go to the exact folder you added to Path. You should see java.exe sitting inside it. If it’s missing, your Path points at the wrong place. A common slip is pointing at the JDK root instead of the bin folder underneath it.
c. Open a fresh terminal.
This one trips up so many people. A terminal reads your environment variables once, at the moment it opens. Change a variable afterward, and the old window never sees it. So close every terminal you have open, then launch a brand-new one and try again.
Still stuck? Sign out of Windows and sign back in. Some terminals, especially ones launched from Explorer or your IDE, hold onto the old environment until your whole session restarts. A quick log-out clears that cache. A full reboot does the same if you’d rather.
Once Windows can see the bin folder, java -version answers straight away.
Everyone makes this one once. I did too. JAVA_HOME must stop at the JDK root folder, not the bin inside it.
Here’s why that matters. Tools like Maven, Gradle, and Tomcat take your JAVA_HOME and add their own subfolder on the end. So they build a path like %JAVA_HOME%\bin\javac.exe all by themselves.
Now picture what happens if JAVA_HOME already ends in \bin. Maven appends another \bin, and it goes hunting for:
...\jdk-11\bin\bin\javac.exe
That file doesn’t exist. So the build dies with a message that never actually says “wrong path.” Confusing, right?
The fix is quick. Trim the \bin off the end of JAVA_HOME so it points at the root, like C:\Program Files\Java\jdk-11. Then open a fresh terminal and try again.
This is the classic sign of a JRE-only setup answering first. Your compiler is fine. Something else is just jumping ahead of it in line.
Here’s the culprit. Windows drops a small java.exe stub in C:\ProgramData\Oracle\Java\javapath. That stub only runs programs. It has no javac. And because its folder often sits near the top of your Path, it answers before your real JDK does.
So java works, javac fails, and nothing looks obviously broken. Two fixes clear it up:
%JAVA_HOME%\bin above the javapath entry in your Path list.javapath entry completely, as long as nothing else on your machine relies on it.After either fix, run where java again. The first line should now point at your JDK 11 folder, not the old stub.
You installed 11. Yet java -version cheerfully prints 8 or 17. Annoying, but easy to explain.
An older JDK simply sits earlier in your Path. Windows stops at the first match it finds, so that older copy wins before yours gets a turn.
Here’s how to put JDK 11 back in front:
where java and read the first line. That’s the copy currently winning.%JAVA_HOME%\bin and click Move Up until it sits above the older entry.JAVA_HOME itself points at your JDK 11 root folder.java -version once more.It should read 11 now. If it still doesn’t, an old entry is probably hiding lower in the list, so scroll the whole thing.
Terminals cache your environment. IDEs cache it harder. IntelliJ or Eclipse will happily ignore a JAVA_HOME you fixed ten minutes ago.
Why? Your IDE reads the environment once, when it launches. Change a variable afterward, and it keeps using the old one until you restart it fully.
So restart the whole IDE. Don’t rely on a “Reload project” click, because that rarely refreshes the underlying environment. Close it completely and open it again.
The same rule applies to the integrated terminal inside VS Code. A fresh terminal tab isn’t enough if the parent VS Code window is still holding the old values. Restart the editor itself, then check the version once more.
Real work rarely stays on one version. Your old project needs Java 8, your new one wants Java 17, and a tutorial insists on 11.
Good news: JDKs never fight each other. Each installer writes into its own folder, so several versions coexist quite happily:
C:\Program Files\Java\jdk1.8.0_361
C:\Program Files\Java\jdk-11.0.18
C:\Program Files\Java\jdk-17.0.9
C:\Program Files\Java\jdk-21.0.2
Only JAVA_HOME and Path decide which one your terminal reaches. Change JAVA_HOME, open a new terminal, and you have switched versions.
Clicking through dialogs every time gets old fast. Save this as use-java11.bat and run it from an admin prompt:
@echo off
setx JAVA_HOME "C:\Program Files\Java\jdk-11.0.18" /M
echo JAVA_HOME now points to JDK 11. Open a new terminal.
Copy the file, swap the folder, and you have use-java17.bat as well. Remember that setx writes permanently but does not touch the current window, so a fresh terminal is still required.
One more habit worth building: let each IDE project pin its own JDK. IntelliJ and Eclipse both store a per-project SDK, which keeps an old codebase on Java 8 while your terminal stays on 11.
Removing a JDK takes four steps:
Step four matters most. A JAVA_HOME aimed at a deleted folder produces some genuinely baffling errors.
Moving from JDK 11 to 17 or 21? Skip the uninstall. Install the new version alongside the old one, then edit JAVA_HOME to point at the new folder.
Because your Path entry reads %JAVA_HOME%\bin, it follows along on its own. Open a new terminal, run java -version, and you should see the new number. Roll back any time by editing JAVA_HOME once more.
JDK 11 is an LTS release, short for Long-Term Support. Oracle keeps patching LTS versions for years, which is why companies standardise on them and why so many tutorials still target 11.
| Version | Released | LTS? | Typical use today |
|---|---|---|---|
| Java 8 | 2014 | Yes | Legacy enterprise systems |
| Java 11 | 2018 | Yes | Very common in production and courses |
| Java 17 | 2021 | Yes | The default for most new projects |
| Java 21 | 2023 | Yes | Virtual threads, records, pattern matching |
| Java 25 | 2025 | Yes | The newest LTS release |
Here is the reassuring part. Installing Java 17, 21, or 25 follows exactly the steps above. Download, run the installer, set JAVA_HOME, add %JAVA_HOME%\bin to Path, verify. Only the version digits in the folder name change.
Which should you pick? Follow your course or your team. Learning from a JDK 11 tutorial? Install 11 and avoid needless surprises. Starting fresh on your own project? Reach for 17 or 21, then read our Java 25 features overview to see what landed since JDK 11.
A: The JVM executes bytecode, and nothing more. Wrap it together with the core libraries and you get the JRE, which runs a finished Java application. Add the compiler and the other developer tools on top and you get the JDK. Developers install the JDK; end users only need the runtime.
A: The installer does not touch your Path variable. Add %JAVA_HOME%\bin to Path yourself, then open a brand new terminal window. Windows reads environment variables once per process, so an already-open terminal keeps the old values.
A: Always the JDK root, for example C:\Program Files\Java\jdk-11.0.18. Tools like Maven and Gradle append \bin themselves. Adding \bin to JAVA_HOME creates a double bin path and breaks those tools.
A: Yes, and most developers do. Each version installs into its own folder. JAVA_HOME plus the order of Path entries decides which one your terminal picks, and each IDE project can pin a different JDK.
A: No. From Java 11 onward Oracle stopped shipping a standalone JRE download. The JDK already contains a complete runtime, so one install covers both compiling and running.
A: Run “where java” to list every java.exe on your Path in priority order. The first line wins. Combine it with “java -version” and “echo %JAVA_HOME%” for a complete picture of your setup.
A: For learning and for maintaining existing systems, absolutely. JDK 11 remains a supported LTS release and powers a huge amount of production code. For a brand new project, though, prefer a newer LTS such as Java 17, 21, or 25.
A: Yes. Download the ZIP build instead of the .exe installer, unzip it into a folder you own, and define JAVA_HOME as a user variable rather than a system variable. Everything else in this guide stays the same.
Let us recap the whole journey. You downloaded JDK 11 from Oracle, ran the installer, and watched the files land under Program Files.
Then came the part that trips everyone up. You created JAVA_HOME so build tools can find the JDK, and you added %JAVA_HOME%\bin to Path so Windows can find java and javac. A fresh terminal made both changes visible.
Finally you proved the setup with real code. javac Test.java compiled, java Test ran, and “Hello Developer” appeared on screen.
Keep one sentence in mind whenever Java misbehaves on a new machine. Windows finds commands through Path, and tools find the JDK through JAVA_HOME. Nearly every installation problem traces back to one of those two, and now you know how to fix both.
Your compiler is ready. Time to write some Java.