What Is Spring AI Framework: ChatClient & ChatModel with OpenAI (Beginner’s Guide)
-
Last Updated: September 24, 2026
-
By: javahandson
-
Series

What is Spring AI framework? Learn ChatClient vs ChatModel, build your first Spring Boot app with OpenAI, and understand RAG, tools and Advisors.
AI is slowly becoming a normal part of Java applications. In this guide, we will learn what the Spring AI framework is and how a Spring Boot app can talk to OpenAI. We will also understand the two classes you will use every day: ChatModel and ChatClient.
A few years back, “AI features” meant a separate Python team. But today, business teams expect normal apps to summarise documents, answer questions and search company data. So as Java developers, we also need a clean way to add these features.
However, calling an AI provider directly is not much fun. You have to learn their HTTP API, their JSON format, their auth headers and their error codes. After that, if the company changes the provider, you do a lot of that work again.
This is exactly the gap Spring AI fills. Basically, it brings the same Spring style you already know. You get dependency injection, auto-configuration, starters and simple POJOs. On top of that, you get ready-made building blocks like ChatClient, Advisors and vector stores.
Here is what we will cover in this article:
ChatModel isChatClient isLet us start from the basics.
Spring AI is a framework from the Spring team. Its job is to make AI integration easy inside Spring applications.
The Spring team calls it an application framework for AI engineering. The idea is simple. They want to apply familiar Spring principles to AI apps. Specifically, these principles are portability, modularity and POJO-based development. Additionally, another big goal is to connect your enterprise data and APIs with AI models.
If you have worked with Spring Boot, the idea will feel familiar. Let us understand it with a small example.
Suppose your app wants to send this question to an AI model:
Explain Java virtual threads in simple words.
Without any framework, your code has to do all of this:
That is a lot of plumbing code. Moreover, none of it is your actual business logic.
With Spring AI, the same thing looks like this:
String response = chatClient
        .prompt("Explain Java virtual threads in simple words.")
        .call()
        .content();
That’s just four lines of code. In fact, the framework handles all the talking with the configured model.
Honestly, this is not a new idea for Spring developers. We have seen this pattern many times before:
JdbcTemplate   -> hides raw JDBC
RestClient     -> hides raw HTTP calls
WebClient      -> hides reactive HTTP calls
JpaRepository  -> hides SQL for common queries
ChatClient     -> hides raw AI provider calls
Each one gives a higher-level API over a lower-level technology, so you write less plumbing. In the same way, Spring AI does this for AI models.
A fair question is, “Can’t I just call OpenAI directly from Java?”
Yes, you can. Also, Spring AI does not stop you from doing that.
However, the real benefit is a consistent programming model. Let us take a simple case. Your app starts with OpenAI, and the flow looks like this:
Spring Boot Application
        |
        v
    Spring AI
        |
        v
     OpenAI
After six months, your team may decide to try Anthropic or Google. Maybe the cost is lower. Maybe the quality is better for your use case.
In that case, Spring AI’s portable APIs help a lot. This is because most of your code talks to Spring AI interfaces, not to the OpenAI SDK. As a result, far less code is tied to one vendor.
Still, let us be practical here. Switching providers will not always be zero-change. After all, every model has different features and different options. But you get a common base to build on, and that saves real effort.
Spring AI also supports both styles of calling a model:
Now let us look at the main features one by one. You don’t need to master all of them on day one. Instead, just get a rough idea for now.
To begin with, Spring AI works with the big AI providers. The list includes OpenAI, Anthropic, Google, Amazon Bedrock, Mistral AI, DeepSeek and Ollama.
Depending on the provider, you can use features like:
Overall, the APIs are portable. At the same time, you can still reach provider-specific options when you really need them.
For a Java developer, this is a big relief. Because of this, your app design does not revolve around one AI vendor.
One very popular enterprise pattern is Retrieval-Augmented Generation, or RAG.
Let us understand it with an example. Imagine your company has thousands of internal documents. An employee asks this:
What is our leave policy for employees with more than five years of service?
Obviously, a general AI model does not know your company’s latest HR policy. After all, nobody trained it on your data.
With RAG, the app first searches your own documents. Then it sends the matching text to the AI model as context. After that, the model writes an answer using that context.
The flow looks like this:
User Question
      |
      v
Spring AI
      |
      v
Vector Store  --> finds relevant documents
      |
      v
Relevant Context + Question
      |
      v
AI Model
      |
      v
Final Answer
For this, Spring AI also gives you a portable Vector Store API. It supports many databases, such as:
On top of that, Spring AI has data-ingestion support. Specifically, it helps you load documents into a vector database. Basically, this is the foundation of any RAG application.
AI gets much more useful when it can use your application’s services.
For example, a customer asks this:
What is the status of order 12345?
The AI model has no idea about this order. However, your Spring app already has something like OrderService.findOrder(...).
This is where tool calling helps. The AI model can ask your app to run a piece of Java code. Spring AI lets you expose normal Java methods as tools, for example using the @Tool annotation.
Here is the idea:
User: "Where is my order 12345?"
  |
  v
AI Model  --> asks for tool: getOrderStatus(12345)
  |
  v
Spring Application
  |
  v
OrderService --> Database
  |
  v
Result goes back to the AI Model
  |
  v
Natural-language answer to the user
The model does not run your code itself. Instead, it only asks for it. Your app then runs the method and sends the result back. Then the model turns that result into a friendly reply.
So the AI now works with real application data. It does not depend only on what it learned during training.
| INTERVIEW INSIGHT Interviewers love asking, “Does the AI model execute my Java method?” The answer is no. The model only returns a request saying “please call this tool with these arguments.” Spring AI runs the method inside your application and sends the result back to the model. Your code, your security rules and your transactions stay in your control. |
Spring AI also supports the Model Context Protocol, or MCP.
MCP is a standard protocol. It lets AI applications talk to external tools and resources in one common way. In other words, think of MCP as a universal adapter:
AI Application
      |
      v
     MCP
      |
  -------------------
  |        |        |
 APIs   Database   Tools
Spring AI also gives you Spring Boot starters and annotations for both sides. You can build an MCP client, and you can also build an MCP server.
This is really useful for Java teams. For example, your existing Spring services can become tools that any AI app can discover and use.
A small MCP server method looks like this:
@Service
public class WeatherService {

    @McpTool(description = "Get current temperature for a location")
    public String getTemperature(String city) {
        return "Temperature for " + city;
    }
}
Spring AI takes care of most of the MCP plumbing around this class. Therefore, you mostly focus on the business method.
Let us say you are building a chat assistant. The chat goes like this:
User: My name is John.
AI:   Nice to meet you, John.
User: What is my name?
For the last question to work, the model needs the earlier messages. Here is the catch. AI models are stateless, so every call is a fresh call for them.
Spring AI gives you Chat Memory to solve this. It stores earlier messages and adds them to the next request.
One important point to remember is this. ChatClient does not remember conversations on its own. You have to set up memory yourself, usually through an Advisor.
The flow looks like this:
Request 1 --> saved in Chat Memory --> AI Model

Request 2 --> previous messages added --> AI Model
The Advisors API is one of my favourite parts of Spring AI.
Advisors let you step in before and after an AI call. You can change the request, add extra data or check the response. If you know Servlet filters or Spring interceptors, you already get the idea.
Application
     |
     v
Advisor 1 (e.g. add chat memory)
     |
     v
Advisor 2 (e.g. add RAG context)
     |
     v
AI Model
An Advisor can do things like:
The Spring docs describe Advisors as a way to package common generative-AI patterns. Here is how you plug them in:
ChatClient chatClient = ChatClient.builder(chatModel)
        .defaultAdvisors(
                MessageChatMemoryAdvisor.builder(chatMemory).build(),
                QuestionAnswerAdvisor.builder(vectorStore).build()
        )
        .build();
In this code, the first Advisor adds conversation memory. Meanwhile, the second one adds RAG. As a result, your business logic stays clean. All the AI plumbing sits in Advisors instead.
| INTERVIEW INSIGHT If someone asks “Where do you put cross-cutting AI logic like memory or RAG?”, say Advisors. They work like interceptors around every ChatClient call. In Spring AI 2.0, even tool calling runs as part of this Advisor chain, which makes the whole flow composable. |
AI calls are not like normal Java method calls. They can be:
Because of this, you need good visibility in production. Luckily, Spring AI plugs into the Spring observability stack. It gives you metrics and tracing for these parts:
ChatClient
ChatModel
EmbeddingModel
ImageModel
VectorStore
As a result, you can see how long calls take and how many tokens you use.
Spring AI can also log prompts and replies for debugging. However, this is off by default. Prompts may carry sensitive user data, so switch it on with care.
For Java developers, this is the best part. Spring AI behaves like the rest of Spring.
You keep using the things you already know:
So you don’t learn a whole new architecture. AI simply becomes one more capability inside your Spring Boot app.
Look at this controller:
@RestController
public class ChatController {

    private final ChatClient chatClient;

    public ChatController(ChatClient.Builder builder) {
        this.chatClient = builder.build();
    }
}
Nothing special here. Indeed, it is just plain constructor injection. The only difference is that the injected object talks to an AI model in the end.
Spring AI ships Spring Boot starters for AI models and vector stores. When you add the right starter and config, Spring Boot wires most things for you.
For OpenAI, the chain looks like this:
Starter dependency + API key
            |
            v
Spring Boot Auto-Configuration
            |
            v
     OpenAiChatModel bean
            |
            v
     ChatClient.Builder bean
That is why Spring AI apps need very little setup code. You add a dependency, set a key and start coding.
You can use Spring AI wherever your app needs generative AI or “meaning-based” search. Here are some everyday examples.
A customer chats in plain language. Behind the scenes, the app mixes an AI model with order APIs, customer data, help docs and chat history.
With this, users don’t need exact keywords anymore. They can type something like:
Show me documents explaining our production deployment process.
Embeddings and a vector store then find documents with the same meaning, even if the words differ.
You can load PDFs, manuals, wikis and policies into a vector store. After that, people ask questions and RAG finds the right answer.
Embeddings also help you find items that match what the user actually wants.
Similarly, apps can write product descriptions, summaries, emails, reports and documentation.
Likewise, AI models can help flag harmful or unwanted content.
Finally, you can convert audio into text if your chosen provider supports it.
Enough theory. In this hands-on part, we will build a tiny “Hello World” app.
Our app will take a message from the browser and return the AI’s reply. The flow is:
Browser
   |
   | GET /api/chat?message=Hello
   v
ChatController
   |
   v
ChatClient
   |
   v
ChatModel
   |
   v
OpenAI
As per the official docs, Spring AI 2.0.x supports Spring Boot 4.0.x and 4.1.x. So please don’t mix it with an old Spring Boot 3 project.
First, import the Spring AI BOM. It keeps all Spring AI module versions in sync, so you never mix versions by mistake.
<properties>
    <java.version>21</java.version>
    <spring-ai.version>2.0.0</spring-ai.version>
</properties>

<dependencyManagement>
    <dependencies>
        <dependency>
            <groupId>org.springframework.ai</groupId>
            <artifactId>spring-ai-bom</artifactId>
            <version>${spring-ai.version}</version>
            <type>pom</type>
            <scope>import</scope>
        </dependency>
    </dependencies>
</dependencyManagement>
Next, add the Spring MVC starter and the Spring AI OpenAI starter:
<dependencies>
    <dependency>
        <groupId>org.springframework.boot</groupId>
        <artifactId>spring-boot-starter-webmvc</artifactId>
    </dependency>

    <dependency>
        <groupId>org.springframework.ai</groupId>
        <artifactId>spring-ai-starter-model-openai</artifactId>
    </dependency>
</dependencies>
A couple of things to note here.
First, spring-boot-starter-webmvc is the Spring Boot 4 starter for Spring MVC apps. The older spring-boot-starter-web still exists. But in Spring Boot 4, it is deprecated in favour of spring-boot-starter-webmvc.
Second, the current OpenAI starter name is spring-ai-starter-model-openai. Older blogs may show spring-ai-openai-spring-boot-starter. However, that was the old naming scheme. Spring AI changed its starter names, so use the new one with current examples.
First of all, create an API key from your OpenAI Platform account. Then store it in an environment variable called OPENAI_API_KEY.
On Linux or macOS:
export OPENAI_API_KEY=your-key-here
On Windows (PowerShell):
$env:OPENAI_API_KEY="your-key-here"
Now point Spring AI to it in application.properties:
spring.ai.openai.api-key=${OPENAI_API_KEY}Then Spring Boot reads ${OPENAI_API_KEY} from your environment at startup.
Please never write the key directly like this:
# Don't do this
spring.ai.openai.api-key=sk-xxxxxxxx
Sooner or later, someone commits it to Git by mistake. Then you have to rotate the key in a hurry.
All OpenAI settings use the spring.ai.openai prefix. You can also choose the chat model if you want:
spring.ai.openai.chat.model=gpt-5-mini
Feel free to change the model as per your needs and budget.
Now create a simple REST controller:
package com.example.ai.controller;

import org.springframework.ai.chat.client.ChatClient;
import org.springframework.web.bind.annotation.GetMapping;
import org.springframework.web.bind.annotation.RequestMapping;
import org.springframework.web.bind.annotation.RequestParam;
import org.springframework.web.bind.annotation.RestController;

@RestController
@RequestMapping("/api")
public class ChatController {

    private final ChatClient chatClient;

    public ChatController(ChatClient.Builder chatClientBuilder) {
        this.chatClient = chatClientBuilder.build();
    }

    @GetMapping("/chat")
    public String chat(@RequestParam("message") String message) {
        return this.chatClient
                .prompt(message)
                .call()
                .content();
    }
}
That’s all the code we need for this basic example.
Notice the constructor. Thanks to auto-configuration, Spring Boot gives you a ChatClient.Builder for your chat model, so there is no manual setup. So we simply inject it and call build(). The official Spring AI getting-started guide also uses this same builder pattern.
Start the Spring Boot app. Then call the endpoint from a terminal:
curl "http://localhost:8080/api/chat?message=Explain%20dependency%20injection%20in%20simple%20words"
You can also open the URL in a browser. Within a few seconds, you should see a plain-text answer from the model.
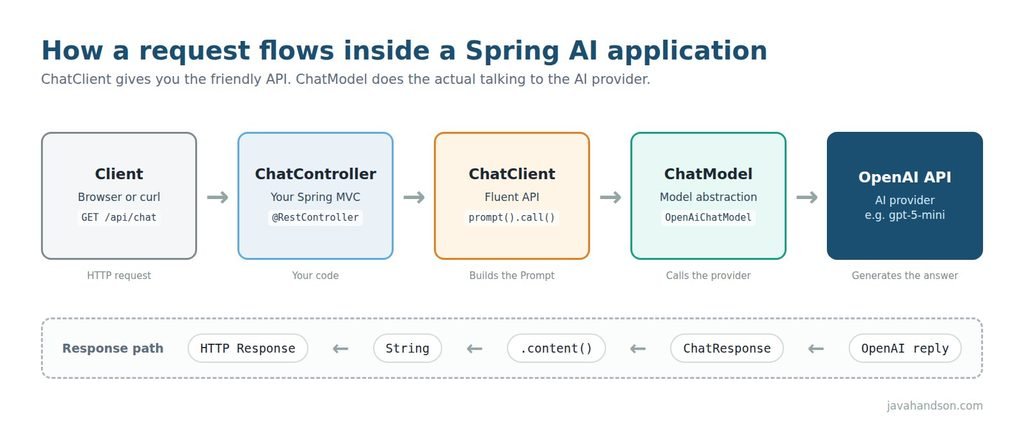
Here is the full journey of one request:
HTTP Request
      |
      v
ChatController
      |
      v
ChatClient  --> builds the Prompt
      |
      v
ChatModel (OpenAiChatModel)
      |
      v
OpenAI API
      |
      v
ChatResponse
      |
      v
content()  --> plain String
      |
      v
HTTP Response
And just like that, your Spring Boot app is talking to an AI model.
Now we come to one of the most important concepts in Spring AI.
ChatModel is the lower-level abstraction for a conversational AI model.
Spring AI defines it as a portable interface. Because of this, your app can talk to many providers through one common type.
In a very simplified form, it looks like this:
public interface ChatModel {

    String call(String message);

    ChatResponse call(Prompt prompt);
}
The real interface has more. It also plugs into Spring AI’s generic model and streaming abstractions. But for learning, this picture is enough.
Also, each provider has its own implementation. For OpenAI, it looks like this:
ChatModel (interface)
    |
    v
OpenAiChatModel (implementation)
    |
    v
OpenAI API
The ChatModel layer deals with things like:
Prompt
ChatResponse
So think of ChatModel as the engine. It does the actual work of talking to the AI model.
You can inject ChatModel into any bean:
@Service
public class MyService {

    private final ChatModel chatModel;

    public MyService(ChatModel chatModel) {
        this.chatModel = chatModel;
    }

    public String explain() {
        return chatModel.call("Explain Spring Boot in one sentence.");
    }
}
This is completely valid code.
For advanced cases, you can work with lower-level objects like Prompt, ChatResponse and ChatOptions:
ChatResponse response =
        chatModel.call(new Prompt("Explain Spring AI"));
Working with ChatModel gives you more control. Even so, most developers find ChatClient easier for day-to-day work.
ChatClient is the higher-level API for chatting with AI models.
The official docs call it a fluent API for talking to an AI model. It also supports both synchronous and streaming calls. In Spring AI 2.0, the Spring team clearly positions ChatClient as the main API for developers.
Look at this code again:
chatClient
    .prompt("Explain Spring AI")
    .call()
    .content();
Now compare it with WebClient:
webClient
    .get()
    .uri("/users")
    .retrieve();
Both feel very similar, right? That is by design. Spring built ChatClient to feel like WebClient and RestClient.
ChatClient helps you build and run AI conversations. Take this example:
String answer = chatClient
    .prompt()
    .system("You are a Java programming teacher.")
    .user("Explain HashMap.")
    .call()
    .content();
Here we clearly split two things:
Then both go into one Prompt, and the prompt goes to the model.
System instruction + User message
               |
               v
            Prompt
               |
               v
            Model
Spring AI’s prompt model also supports placeholders, model options and more. Hence, ChatClient is the natural choice for normal application code.
ChatClient can also map the answer straight into a Java type. This is called structured output. Here is a small example with a record:
record BookSuggestion(String title, String author, String reason) {}

BookSuggestion book = chatClient
    .prompt()
    .user("Suggest one good book for learning Java concurrency.")
    .call()
    .entity(BookSuggestion.class);
Instead of content(), we call entity(). Spring AI asks the model for JSON in the right shape and converts it for you. This is very handy when the AI output feeds into your own logic.
The easiest way to remember the difference is this:
ChatModel  = Engine
ChatClient = Steering wheel + dashboard
The engine does the real work. Meanwhile, the steering wheel gives the driver an easy way to control it.
Here is a quick side-by-side view:
| Point | ChatModel | ChatClient |
|---|---|---|
| Level | Lower-level abstraction | Higher-level fluent API |
| Main job | Talks to the AI provider | Builds prompts and runs calls |
| Style | Method calls with Prompt objects | Fluent chain like WebClient |
| Advisors, memory, RAG | Not built in | Plugged in via Advisors |
| Structured output | Manual work | Easy with entity() |
| Best for | Fine-grained control | Everyday application code |
| INTERVIEW INSIGHT A common interview question is “Which one should I use, ChatModel or ChatClient?” A good answer is: use ChatClient for normal application code because it supports Advisors, memory, RAG and structured output. Drop down to ChatModel only when you need low-level control over Prompt, ChatOptions or the raw ChatResponse. Also mention that ChatClient is built on top of a ChatModel, so they are not competitors. |
Let us walk through what happens from app startup to the final reply.
You add the spring-ai-starter-model-openai dependency. Then you set the API key:
spring.ai.openai.api-key=${OPENAI_API_KEY}At startup, auto-configuration creates the OpenAI model setup. In short, you get an OpenAiChatModel bean.
Next, Spring AI provides a ready ChatClient.Builder bean. Your controller gets it through normal constructor injection:
public ChatController(ChatClient.Builder builder) {
    this.chatClient = builder.build();
}
The key point is that the builder already knows about the configured model.
When you write chatClient.prompt("Explain Spring AI"), ChatClient starts preparing the prompt. It collects the system text, user text, options and advisors.
When you call .call(), the request goes to the chat-model layer:
Your Java Code
       |
       v
ChatClient
       |
       v
Prompt
       |
       v
ChatModel --> OpenAiChatModel
       |
       v
OpenAIOpenAI sends the reply. Then it travels back through the same layers:
OpenAI --> ChatModel --> ChatClient --> content()
Finally, .content() pulls out just the generated text. For our simple example, that plain string is all we need.
If you remember only one diagram from this article, keep this one in mind.
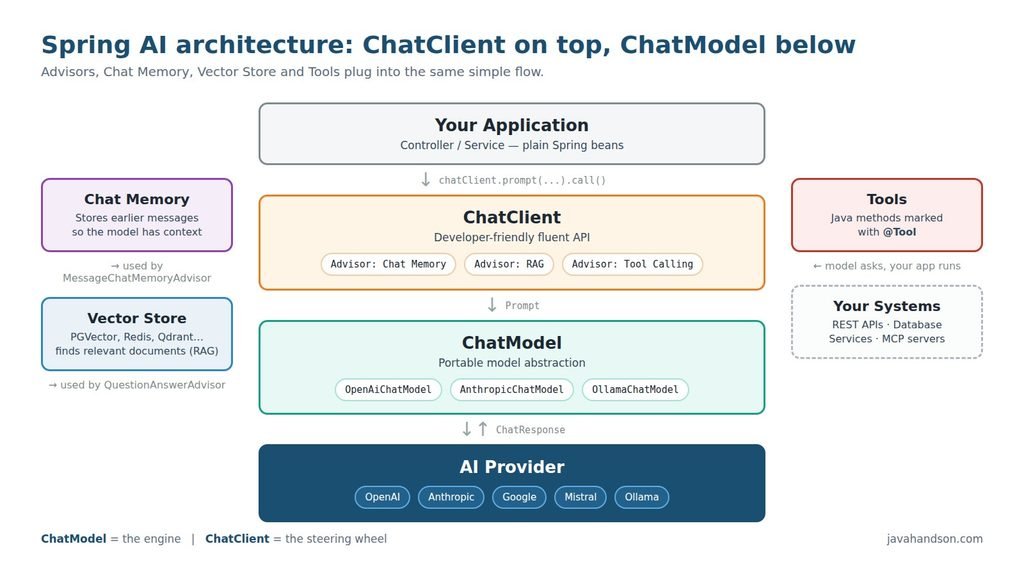
User Request
     |
     v
Controller / Service
     |
     v
ChatClient   (developer-friendly fluent API)
     |
     v
Prompt
     |
     v
ChatModel    (model abstraction)
     |
     v
AI Provider  (OpenAI / Anthropic / Google / ...)
     |
     v
ChatResponse --> ChatClient --> Application
Once this is clear, the rest of Spring AI becomes much easier. Later, you can plug more parts into the same picture:
ChatClient callsThis is exactly why Spring AI is much more than a simple API wrapper.
I have seen these mistakes many times. Try to avoid them from day one.
Many older tutorials use spring-ai-openai-spring-boot-starter. That name belongs to the early releases. With current versions, use spring-ai-starter-model-openai. Otherwise, Maven simply won’t find the right dependency.
Spring AI 1.x used keys like spring.ai.openai.chat.options.model. However, Spring AI 2.0 dropped the extra .options part. So the key becomes spring.ai.openai.chat.model. If your setting has no effect, check this first.
Spring AI 2.0 needs Spring Boot 4. On the other hand, Spring AI 1.x works with Spring Boot 3. Therefore, mixing them usually ends in confusing startup errors.
Instead, always read the key from an environment variable or a secrets manager. Otherwise, a leaked key can cost real money within hours.
Because models are stateless, every call is fresh. If you want a real conversation, configure Chat Memory with an Advisor.
Prompt logging is great for debugging. But prompts can contain customer names, account details or internal data. Keep it off in production unless you mask sensitive data.
Spring AI has many features. If you jump into RAG, MCP and Advisors on day one, you will get lost. Instead, start small, as explained in the next section.
Don’t try to learn the whole framework in one weekend. Follow this order instead:
ChatModel
ChatClient
Your first goal should be very simple. Just understand this flow:
User --> ChatClient --> ChatModel --> AI Provider
Once this flow is clear, adding RAG, tools, memory, Advisors and MCP feels natural. After all, each one is just a new piece in the same picture.
A: Spring AI is a framework from the Spring team that lets Spring Boot apps talk to AI models like OpenAI, Anthropic or Ollama. It gives you familiar Spring building blocks such as auto-configuration, starters and the ChatClient API, so you don’t write raw HTTP calls to each provider.
A: ChatModel is the lower-level abstraction that actually talks to the AI provider. ChatClient is a higher-level fluent API built on top of a ChatModel. Think of ChatModel as the engine and ChatClient as the steering wheel. For normal application code, ChatClient is the better choice.
A: Spring AI 2.0.x works with Spring Boot 4.0.x and 4.1.x. If your project is still on Spring Boot 3, use Spring AI 1.x instead. Mixing Spring AI 2.0 with Spring Boot 3 usually leads to confusing startup errors.
A: No. The model only returns a request asking your app to call a tool with certain arguments. Spring AI runs the Java method inside your application and sends the result back to the model. So your security rules, transactions and data stay under your control.
A: No. AI models are stateless, so every call is fresh. To build a real conversation, you configure Chat Memory and plug it into ChatClient using an Advisor such as MessageChatMemoryAdvisor.
A: Advisors work like interceptors around every ChatClient call. They can add chat history, fetch RAG context from a vector store, change the prompt or check the response. They keep AI plumbing out of your business logic, and in Spring AI 2.0 even tool calling runs through the Advisor chain.
Spring AI brings AI into the Spring world using ideas Java developers already know.
You don’t have to write raw integrations against every provider’s API. Instead, you get ready abstractions for models, prompts, vector stores, tool calling, memory, RAG, MCP and observability.
At the centre of it all, there are two key types:
ChatModel, the lower-level abstraction that talks to the AI modelChatClient, the fluent API you use in everyday codeRemember them like this:
ChatModel  = the engine
ChatClient = the steering wheel
Together, they give you the basic Spring AI request flow:
Application --> ChatClient --> ChatModel --> AI Provider --> ChatResponse --> Application
Moreover, everything else builds on this base. That includes RAG, vector databases, tool calling, chat memory, Advisors, MCP, structured output and observability.
I hope this guide made the Spring AI framework clear. For Java developers, Spring AI is one of the easiest ways to start building real AI apps. So pick a small idea, add the starter and write your first ChatClient call today.