Authentication and Authorization at Scale: OAuth2, JWT, OIDC, and Token Validation Patterns
-
Last Updated: November 5, 2026
-
By: javahandson
-
Series

Authentication and authorization at scale explained: OAuth2, OIDC, JWT, token validation patterns, and token security, with examples and interview tips.
Every request that hits your backend asks the same two questions. Who is calling? And are they allowed to do this? The first question is authentication. The second is authorization. On a small app, both feel trivial. You check a session in a database, and you move on. But authentication and authorization at scale is a very different problem, and it trips up even experienced engineers.
Once you run many services across many machines, a shared session table becomes a bottleneck. Every service would have to call it on every request. That one table turns into a single point of failure for your whole fleet. So large systems lean on tokens instead. A token travels with the request and carries proof of identity, so services can trust it without a central lookup every time.
This article is a deep, hands-on walk through the building blocks that make this work: OAuth 2.0, OpenID Connect, JSON Web Tokens, token validation patterns, and the attacks you must defend against. We will keep the language simple and the examples concrete. By the end, you will understand how a login turns into a token, how a service checks that token in a millisecond, how attackers try to forge one, and how to design the whole thing to survive real traffic. These are exactly the ideas that senior system design interviews love to probe.
People mix up these two words all the time, yet they mean different things. Getting the distinction right is the foundation for everything else.
Think about arriving at an airport. First, the agent checks your passport to confirm you are who you say you are. That step is authentication. Later, your boarding pass decides which flight and which seat you can board. That step is authorization. The passport proves identity. The boarding pass grants specific access.
Software works the same way. Authentication answers “who are you?” through a login, a password, or a trusted identity provider. Authorization answers “what may you do?” through roles, permissions, or scopes. You always authenticate first, then authorize. A valid identity with no permission still gets a polite refusal.
On one server, you can keep it easy. Store a session in memory, look it up, done. But picture fifty services spread across three regions. A login in one place must be trusted everywhere else, instantly. You cannot ask every service to phone a central database on each call. The latency and the load would be brutal.
This is why tokens exist. A token is a small, signed piece of data. The identity provider creates it once, at login. After that, services verify it locally and move on. No shared session table sits in the hot path. That single shift, from server-side sessions to signed tokens, is what makes modern identity scale.
Scale also raises the stakes for mistakes. A weak session check on one server is a small bug. The same weakness, copied into fifty services that all trust the same token, becomes a fleet-wide hole. So the patterns below are not just about speed. They are about keeping a large, distributed system safe without a central guard on every call.
OAuth 2.0 is the industry standard for authorization, defined in RFC 6749. One point confuses almost everyone at first. OAuth 2.0 is an authorization framework, not an authentication protocol. Its real job is to let an app access resources on your behalf without ever seeing your password.
Imagine a photo-printing site that wants your Google Photos. The old, scary way was to hand over your Google password. OAuth replaced that. Instead, Google authenticates you directly, then hands the printing site a limited token. The site gets access to your photos only, and nothing else. Your password never leaves Google.
OAuth defines four roles, and naming them keeps every flow clear. Learn these once and the diagrams stop being scary.
A grant type is simply the method an app uses to obtain a token. OAuth offers several, because apps differ. Some run in a browser. Others have a secure backend. A few have no user at all. Each grant type fits a different situation. Picking the right one is a genuine security decision, not a detail.
Authorization Code with PKCE
This is the workhorse for apps that involve a human logging in. The user is redirected to the authorization server, signs in, and the app receives a short-lived code. Next, the app swaps that code for a token on the back channel. The token never rides through the browser URL, which keeps it safer.
PKCE (pronounced “pixy”) is an extension that hardens this flow. The client creates a random secret, the code verifier, and sends a hashed version up front. At the end, it must present the original secret to redeem the code. This blocks an attacker who intercepts the code, because they lack the verifier. Modern guidance recommends PKCE for every client type, even confidential ones with a backend.
The Authorization Code + PKCE Flow, Step by Step
It helps to see the whole dance once, in order. Here is what actually happens when a user clicks “Sign in”.
Notice the clever part. The challenge goes out in the open, through the browser. But the verifier stays inside the client until the final back-channel call. So a thief who grabs the code from the redirect still cannot redeem it. Without the verifier, the code is useless. That is the whole point of PKCE in one sentence.
Client Credentials
Sometimes no user is involved at all. One service needs to call another service. This is machine-to-machine traffic. Here the client authenticates as itself using its own credentials, and receives a token. There is no login screen because there is no person. Batch jobs and internal microservice calls use this grant every day.
Device Code and Refresh Token
The device grant handles gadgets with no keyboard, like a smart TV. You see a short code on screen and type it on your phone instead. Separately, refresh tokens solve a different need. Access tokens expire quickly on purpose. A refresh token lets the app quietly get a new access token without forcing the user to log in again.
| Note A quick history note: the old Implicit grant returned a token straight to the browser. It is now discouraged, and OAuth 2.1 removes it entirely. For new browser and mobile apps, use Authorization Code with PKCE instead. |
Whatever grant you use, the output is the same prize: an access token. The client attaches it to every API call, usually in an HTTP header that reads “Authorization: Bearer <token>”. The resource server reads that token and decides whether to serve the request. So the whole flow exists to mint this one small string, and then to check it fast on every later call.
# The client sends the access token on every request.
GET /api/orders/42 HTTP/1.1
Host: api.example.com
Authorization: Bearer eyJhbGciOiJSUzI1NiIsImtpZCI6Imsx...

# The resource server validates the token,
# then returns the data (or 401 / 403 if it fails).
One word in that header matters a lot: Bearer. A bearer token works for whoever holds it, like cash. If someone steals it, they can spend it until it expires. That simple fact drives much of the security work later in this article. Short lifetimes, careful storage, and sender-constrained tokens all exist to limit the damage a stolen bearer token can do.
OAuth handles access, but it never officially answers “who is this user?”. That gap is where OpenID Connect comes in. OIDC is a thin identity layer built on top of OAuth 2.0. It reuses the same flows and adds a standard way to learn who logged in. Whenever you click “Sign in with Google,” you are using OIDC.
OIDC introduces a second token, the ID token, and this pairing confuses many developers. The two tokens have different audiences and jobs. Keep them straight and a lot of design questions answer themselves.
A simple rule keeps you safe. The ID token is for the app that started the login. The access token is for the API behind it. Never send an ID token to an API as an access token, and never let an API make trust decisions off an ID token it received by accident. Mixing them is a classic security bug.
A client needs to know a provider’s URLs: where to log in, where to get tokens, where the keys live. OIDC standardizes this so you do not hardcode anything. Every provider publishes a JSON document at a fixed path, “/.well-known/openid-configuration”. The client reads it once and learns every endpoint automatically.
// GET https://idp.example.com/.well-known/openid-configuration
{
  "issuer": "https://idp.example.com",
  "authorization_endpoint": "https://idp.example.com/authorize",
  "token_endpoint":         "https://idp.example.com/token",
  "userinfo_endpoint":      "https://idp.example.com/userinfo",
  "jwks_uri":               "https://idp.example.com/.well-known/jwks.json"
}
Discovery pays off at scale. When the provider rotates a key or moves an endpoint, clients pick up the change on their next read. You do not redeploy fifty services to update a URL. This loose coupling between clients and the provider is a small design detail that saves real operational pain.
Sometimes the ID token does not carry every detail you want. The UserInfo endpoint fills that gap. The client calls it with the access token and gets fresh profile claims back. Use the ID token when you need identity right away and want no extra call. Use UserInfo when you need the freshest data, or when your access token is opaque rather than a JWT.
JSON Web Tokens, or JWTs, are the format that makes stateless identity possible. A JWT carries its claims inside itself and signs them. Because the signature proves the token is genuine, any service can trust it without calling the issuer. That self-contained nature is the whole point, so it is worth understanding the anatomy.
A signed JWT has three parts, joined by dots, in the shape header.payload.signature. Each part is Base64URL-encoded, so it is readable, not encrypted. That last point surprises people. Anyone can decode and read a JWT. The signature stops tampering, but it does not hide anything. So never put secrets or passwords inside one.
Header (decoded):   { "alg": "RS256", "kid": "k1", "typ": "JWT" }
Payload (decoded):  { "iss": "https://idp.example.com",
                      "sub": "user-123",
                      "aud": "orders-api",
                      "scope": "orders:read",
                      "exp": 1730462400 }
Signature: <RS256 signature over header.payload>Not all claims are equal, and the spec sorts them into three groups. Knowing the groups helps you design a token that is both useful and portable.
A word of caution on size. Every claim you add makes the token bigger, and the token rides on every single request. A bloated token wastes bandwidth and can even break header size limits. So keep the payload lean. Put identifiers and a few key attributes in, and fetch the rest from a service when you truly need it.
A JWT can be signed in two broad ways, and the choice matters a lot at scale. Symmetric signing (like HS256) uses one shared secret for both signing and checking. That is fine for one app, but it means every verifier holds the secret that could also forge tokens. Spread that secret across fifty services and your risk explodes.
Asymmetric signing (like RS256 or ES256) is the better fit for distributed systems. The issuer signs with a private key that it alone holds. Every service verifies with the matching public key, which is safe to share widely. A leaked public key cannot forge anything. For authentication and authorization at scale, asymmetric keys are the standard choice.
If services verify with a public key, how do they get it? They fetch it from the JWKS endpoint, which stands for JSON Web Key Set. The issuer publishes its public keys there as JSON. Each key has an id, the kid. When a token arrives, the service reads the kid from the header and picks the matching key from the set.
This design also enables smooth key rotation. The issuer can add a new key while the old one still appears in the set. Tokens signed with either key keep working during the overlap. Services cache the JWKS so they do not fetch it on every request, and they refresh it when they meet an unknown kid. Caching plus rotation keeps verification fast and secure at the same time.
Now we reach the heart of the topic. A token is only useful if a service can check it correctly and quickly. There are two main token validation patterns, and the trade-off between them shapes your whole architecture. Let us walk through both, then compare them honestly.
With a JWT, a service can validate the token entirely on its own. No network call to the issuer is needed. The service already holds the public key, so it just does the math and checks the claims. This is fast, it scales flat, and it even survives a brief outage of the auth server. Here is the order that matters.
// Pseudocode: stateless JWT validation on a resource server.
function validate(token):
    header  = decodeHeader(token)          // read kid, alg
    require(header.alg in ALLOWED_ALGS)     // reject "none"
    key     = jwksCache.get(header.kid)     // cached public key
    require(verifySignature(token, key))    // crypto check
    claims  = decodePayload(token)
    require(claims.exp > now())             // not expired
    require(claims.iss == TRUSTED_ISSUER)   // right issuer
    require(claims.aud == THIS_SERVICE)     // meant for us
return claims // trusted, proceedThe other pattern uses opaque tokens. An opaque token is just a random string with no readable meaning. To learn anything about it, the service must ask the authorization server. This call is token introspection, defined in RFC 7662. The service posts the token to an introspection endpoint and gets back whether it is active, plus its scope and subject.
The big win here is control. Because the issuer owns the state, it can revoke a token the instant a user logs out. The next introspection call returns “active: false” and access ends at once. The cost is a network round trip on every request, and a hard dependency on the auth server being fast and reachable.
This is the single most important decision in the topic, and interviewers return to it often. The honest summary is short. JWTs trade revocation speed for validation speed. Opaque tokens do the exact reverse. You are really choosing which kind of latency you can live with, and how fast you must be able to cut off access.
| Aspect | Stateless JWT | Opaque + Introspection |
|---|---|---|
| Validation | Local, no network call | Remote call per request |
| Speed | Very fast | Slower (round trip) |
| Scales | Flat and easy | Limited by auth server |
| Revocation | Hard (valid until exp) | Instant |
| Auth-server outage | Tolerated | Breaks validation |
| Best for | Read-heavy, low-latency APIs | Sensitive, revoke-now actions |
In practice, large deployments rarely pick one and suffer. They blend both. A common pattern keeps JWT validation on the hot path for speed, then adds an introspection or status check for sensitive operations. So a product listing uses local JWT checks, while a money transfer confirms the token is still active. You get fast reads and tight control where it counts.
Validation checks that a token is genuine. Security asks a harder question: what happens when an attacker tries to cheat the check? A surprising number of real breaches come from small validation slips. So let us look at the common attacks and the exact defense for each.
This classic attack targets lazy verification. Suppose your service verifies tokens signed with RS256, using the issuer’s public key. The public key is, by definition, public. An attacker crafts a token with the header set to HS256, then signs it using your public key as the HMAC secret. If your code lets the token choose the algorithm, it will HMAC-verify with that same public key, and the forged token passes.
The fix is simple and strict. Never let the token’s header decide the algorithm. Pin the expected algorithm on the server and reject anything else. Treat “alg: none” as an instant reject, always. This one rule closes a whole family of forgery attacks, so make it a non-negotiable part of your validation code.
A bearer token is like cash. Steal it, and you can use it until it expires. Attackers grab tokens from logs, from browser storage, from a compromised network hop, or from a leaky error message. Once they hold a valid token, a plain bearer check cannot tell the thief from the real user. So the goal is to shrink both the window and the value of a stolen token.
What if a stolen token simply would not work for the thief? That is the promise of sender-constrained tokens. The token gets bound to a key that only the real client holds. A thief who copies the token still lacks the key, so the token is dead weight in their hands. Two standards deliver this, and both are worth knowing.
These add cost and complexity, so you do not need them everywhere. Reach for them on your most sensitive APIs: payments, admin actions, and high-value data. For ordinary read traffic, short-lived bearer tokens over TLS are usually enough. Match the defense to the value of what you protect, and you spend effort where it counts.
Here is a subtle one. Say a user holds a token meant for a low-trust analytics API. If a powerful billing API also accepts that token, the user can replay it there and do damage. This is audience confusion, and the aud claim exists to stop it. Each service must check that the token was actually minted for it.
A related trap is the confused deputy. A service receives a request and then calls a downstream service on the user’s behalf. If it uses its own powerful identity instead of the user’s, it may do things the user could never do directly. The fix is to pass the user’s identity downstream, not the service’s, which we cover in the section on service-to-service calls.
Stateless JWTs have one nagging weakness. Once issued, a JWT stays valid until it expires, even if you want it gone. There is no central switch to kill it, because no service checks a central store. So how do real systems handle a user who logs out or an account that gets banned? They use a few practical tactics together.
Refresh tokens live much longer than access tokens, so they need their own protection. Rotation is the key idea. Each time the client uses a refresh token, the server hands back a brand-new one and retires the old. The tokens form a family, a chain of one replacing the next.
Now the clever twist: reuse detection. If an old, already-rotated refresh token shows up again, something is wrong. Either an attacker stole it, or a copy leaked. The server treats this as an alarm and invalidates the whole family at once. The real user simply logs in again, while the thief is locked out. This turns a stolen refresh token into a self-defeating prize.
One more choice shapes the user experience: sliding versus absolute expiry. A sliding window extends the session each time the user is active, so busy users stay logged in. An absolute limit caps the total session length no matter what. Many systems combine both, which keeps active users happy while still forcing a fresh login eventually.
Knowing how to validate a token is half the story. The other half is deciding where that validation runs across many services. Doing it well keeps your code clean and your system fast.
In most large systems, an API gateway sits in front of every service. It is the natural place for a first validation. The gateway checks the token signature and the basic claims once, at the edge. Bad tokens get rejected right there, before they ever reach a service. This keeps the heavy, repeated work in one well-tuned spot.
The gateway also centralizes the shared machinery. It caches the JWKS, so backend services do not each fetch keys. For opaque tokens, it can run introspection with a short cache. It can wrap that call in a circuit breaker, so an auth-server hiccup does not cascade. One smart gateway spares every service from reinventing this logic.
A gateway should not make every decision, though. It handles coarse checks well: is the token valid, and does it carry the right scope for this route? But it does not know your business rules. It cannot know that a user may edit only their own orders. So fine-grained checks belong inside the service, close to the data and the logic.
This split is a healthy pattern. The gateway does broad, cheap filtering for everyone. Each service then runs narrow, specific checks per request. The two layers reinforce each other, which is defense in depth. A request must pass both to succeed, so one missed check does not open the door.
Inside a system, one service often calls another to finish a job. How should it prove who it is? Using its own powerful identity invites the confused-deputy problem from earlier. A cleaner answer keeps the user’s identity flowing downstream, so each hop still acts as the user, with the user’s limits.
Token exchange, defined in RFC 8693, formalizes this. A service swaps the incoming token for a new one aimed at the downstream service, often with narrower scope. The original identity is preserved, but the new token fits exactly where it is going. For the network layer, mutual TLS proves workload identity, so services also know which service is calling, not just which user.
At scale, caching is what keeps auth fast, and failure planning is what keeps it up. A few habits matter here. Cache the JWKS, but refresh it when an unknown kid appears, so key rotation never locks you out. Cache positive introspection results briefly, never past the token’s own expiry.
We have spent a lot of time on authentication, because tokens carry identity. Now we turn fully to authorization, which decides what an identity may do. At scale, you need a model that stays manageable as rules and users multiply.
Scopes are the coarse layer of authorization, and they live inside the token. A scope like “orders:read” says the client may read orders but not write them. The gateway can enforce scopes quickly, because they sit right in the token. Claims go finer. A claim might carry the user’s role, department, or tenant, which a service then uses for detailed decisions.
Two models dominate how teams express permissions, and each has a sweet spot. Understanding both lets you pick well instead of defaulting to one.
A useful fact ties them together. ABAC can express any RBAC rule, since a role is just one attribute. But RBAC cannot express a time-based or location-based rule on its own. Many teams start with RBAC for its simplicity, then add ABAC where context truly matters. You do not have to choose only one.
Here is a small ABAC-style rule, written in plain pseudocode, to make it concrete. Notice how it weighs several attributes together before it says yes.
// ABAC decision: may this user approve this expense?
allow if
    user.role    == "manager"            // a role attribute
    and expense.amount < 10000           // a resource attribute
    and expense.region == user.region    // context match
    and now() in BUSINESS_HOURS          // environment attribute
deny otherwise // deny by defaultAs rules grow, baking them into each service gets messy. A cleaner design splits two jobs. The Policy Decision Point, or PDP, evaluates the rules and returns allow or deny. The Policy Enforcement Point, or PEP, sits in the request path and enforces whatever the PDP says. Tools like Open Policy Agent act as a PDP, while the gateway or a sidecar acts as the PEP.
Two more pieces round out the picture. A Policy Information Point supplies extra attributes the decision needs, like a user’s current department. A Policy Administration Point is where teams author and manage the rules. Keep these roles separate, and policy becomes something you manage centrally rather than scatter across code.
This separation pays off at scale. Policies live in one place, so you change a rule once instead of editing fifty services. Enforcement stays distributed and fast, close to each request. Always default to deny, so a missing rule blocks access rather than granting it. You centralize the thinking and distribute the doing, which is the recurring theme of authorization at scale.
One part of access control is quiet but vital: knowing what happened. At scale, you cannot eyeball every decision, so you must record them. Good logging turns a vague “something broke” into a clear trail you can follow. It also satisfies the audits that most serious systems must pass.
These logs do double duty. In an incident, they tell you exactly who touched what and when. Over time, they reveal patterns, like a service that keeps hitting a permission it should not need. So treat audit logging as a first-class feature of your auth design, not an afterthought bolted on at the end.
Let us connect every piece into one journey, from login to a served request. Seeing the full path makes the parts click. The diagram below shows the same flow at a glance.
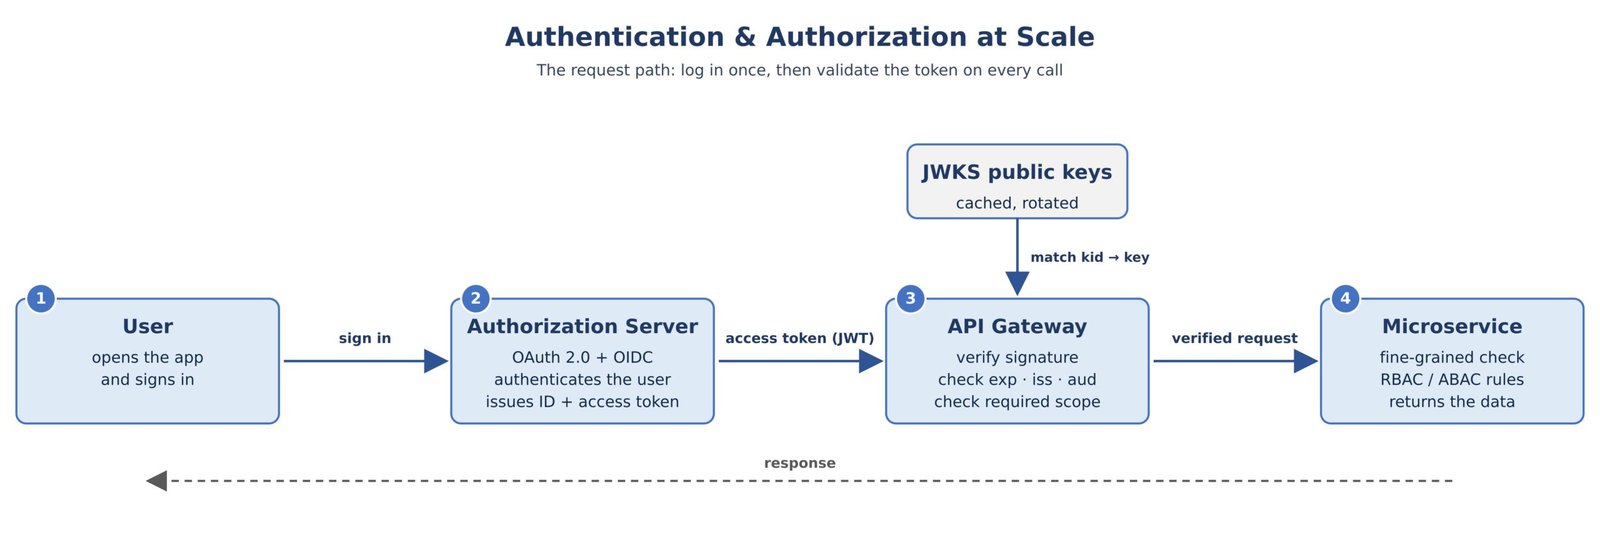
First, the user logs in at the authorization server, which runs OAuth 2.0 and OIDC. That server authenticates the person and issues two tokens: an ID token for the app and a JWT access token for the APIs. The client stores them. From now on, no password is ever sent again.
Next, the client calls an API and attaches the access token. The request reaches the API gateway first. The gateway verifies the signature using a public key from the cached JWKS, then checks expiry, issuer, audience, and the required scope. A bad token stops here with a 401. A valid one passes through, carrying its trusted claims.
Then the request lands on the target microservice. The service trusts the identity, because the gateway already proved it. Now it makes the fine-grained call: may this specific user touch this specific resource? It asks its policy logic, gets an allow, and returns the data. Every step is also logged with a correlation id, so the whole journey is traceable later.
Finally, suppose this service must call a billing service to finish the job. It does not borrow its own powerful identity. Instead, it exchanges the token for a downstream one that still represents the user, with just enough scope. The user’s limits follow them all the way down. That is authentication and authorization at scale working as one connected loop.
A few traps catch beginners again and again. Knowing them early saves painful incidents later.
| 💡 Interview Insight When asked to design authentication for a large system, start by stating the shift from server-side sessions to signed tokens, and explain why a shared session store does not scale. That framing signals senior thinking immediately. |
| 💡 Interview Insight Expect the classic question: JWT or opaque tokens? A strong answer names the trade-off out loud. JWTs give fast, local, stateless validation but weak revocation. Opaque tokens give instant revocation but add a network call. Then mention the hybrid pattern, and you stand out. |
| 💡 Interview Insight Security questions love the validation details. Explain why you pin the algorithm, check the audience, and keep tokens short. Bonus points for naming sender-constrained tokens like DPoP or mTLS for high-value APIs, and for describing refresh token rotation with reuse detection. |
| 💡 Interview Insight Always separate authentication from authorization in your answer. Say that the gateway handles coarse checks like signature and scope, while services handle fine-grained business rules. Tie it to the PDP and PEP split and a deny-by-default stance, and you show real depth beyond buzzwords. |
Here is a compact glossary of every core term from this article, so you can revisit it quickly.
| Term | Meaning in One Line |
|---|---|
| Authentication (AuthN) | Verifying who the user is |
| Authorization (AuthZ) | Deciding what the user may do |
| OAuth 2.0 | A framework for delegated authorization |
| Grant type | The method an app uses to get a token |
| PKCE | An extension that secures the code flow |
| OIDC | An identity layer on top of OAuth 2.0 |
| ID token | A JWT proving who the user is, for the client |
| Access token | A token proving what the client may do, for the API |
| JWT | A self-contained, signed token of claims |
| JWKS | The endpoint publishing the issuer’s public keys |
| Introspection | Asking the auth server if a token is active |
| Sender-constrained token | A token bound to a key, via DPoP or mTLS |
| Refresh rotation | Replacing a refresh token on each use, with reuse detection |
| Token exchange | Swapping a token for a downstream one (RFC 8693) |
| Scope | Coarse permission carried inside a token |
| RBAC / ABAC | Role-based and attribute-based access control |
| PDP / PEP | The policy decision point and enforcement point |
A: Authentication verifies who you are, such as through a login. Authorization decides what you are allowed to do, such as reading or editing a record. You always authenticate first, then authorize each action. A valid identity with no permission still gets refused.
A: OAuth 2.0 is an authorization framework, not an authentication protocol. It lets an app access resources on your behalf without seeing your password. To answer “who is this user?”, you add OpenID Connect (OIDC) on top of OAuth 2.0.
A: An ID token proves who the user is and is meant for the client app. An access token proves what the client may do and is meant for the API. Never send an ID token to an API as an access token, and never let an API make trust decisions off an ID token it received by accident.
A: The service reads the key id from the header, fetches the matching public key from the cached JWKS, and verifies the signature. It then pins the expected algorithm, and checks the standard claims: expiry, not-before, issuer, and audience. If any check fails, it rejects the token. Never trust an “alg: none” header.
A: JWTs validate locally with no network call, so they are fast and scale flat, but they are hard to revoke before expiry. Opaque tokens use introspection for instant revocation, but add a network round trip and depend on the auth server. Many large systems use a hybrid: JWTs on the hot path, plus an introspection check for sensitive actions.
A: A plain JWT stays valid until its expiry, so teams combine tactics. They keep access tokens short-lived, rotate refresh tokens on each use, and keep a small denylist of revoked token ids at the gateway for the few that must die early. Together these give fast-enough revocation without a central lookup on every request.
A: RBAC attaches permissions to roles and roles to users, which is simple and great for stable org structures. ABAC evaluates attributes of the user, resource, and context, which is flexible and context-aware. ABAC can express any RBAC rule, so many teams start with RBAC and add ABAC where context truly matters.
A: An attacker takes your public RSA key, crafts a token with the header set to HS256, and signs it using that public key as the HMAC secret. If your code lets the token choose the algorithm, the forged token passes. Prevent it by pinning the expected algorithm on the server and rejecting anything else, including “alg: none”.
A: They bind a token to a key only the real client holds, so a stolen copy is useless. DPoP (RFC 9449) makes the client sign a small proof with its private key on every request. mTLS-bound tokens (RFC 8705) tie the token to the client’s TLS certificate. Use them on high-value APIs like payments and admin actions.
Authentication and authorization at scale comes down to a handful of ideas working together. OAuth 2.0 delegates access without sharing passwords. OIDC adds a clean answer to who the user is. JWTs make identity portable and fast to verify, while token validation patterns let you choose between speed and control. On top of that, careful signing, audience checks, and sender-constrained tokens keep attackers out.
None of this needs exotic tools. It needs the habit of thinking in tokens, trust boundaries, and trade-offs. Carry that habit into your next design. Choose asymmetric keys, keep tokens short, validate at the gateway and in the service, rotate refresh tokens, and log every decision. Master these foundations, and the harder topics ahead will feel like a natural next step.